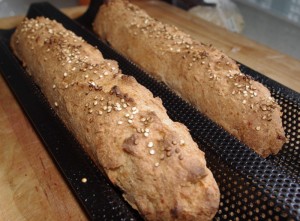
I’ve been playing around with the gluten-free recipes from Healthy Bread in 5 Minutes per day. Zoe Francois and Jeff Hertzberg have done a great job of providing whole grain and gluten-free options for their Artisan Bread in 5 minutes per day method.
Simply put, this method is great for families and households where you would like to be able to make bread with a minimum of fuss. It involves mixing larger batches of dough, and letting a long, cool, delayed fermentation do the rest of the work for you. For wheat-based breads, this method is great, as it develops the gluten structure slowly, but thoroughly, and has the added benefit of the enzymatic reactions typical of a delayed ferment. Obviously, with gluten-free breads, there is no need to develop the gluten, but this method is a great one nonetheless, for the convenience AND for the flavour development
While I’ve been doing my own noodling around with these recipes to make them egg and dairy-free, a while back, I noticed that ABin5 put up their own version of an egg-free, gluten-free version, which was also whole-grain heavy to boot! AWESOME, I thought, and read on, only to discover that it made use of some of the new King Arthur gluten-free flours — not at all readily available to us up here in B.C. In my trials with this method, I’ve moved completely away from commercial egg-replacers as I found them too drying, and been relying on chia seeds or flax seeds, so I was interested to see that ABin5 also fell back on flax seeds for theirs.
Undaunted, I set about to play around and come up with a recipe that would be heavier on whole grains, but be feasible for those of us still buying our flours separately! This is my modification of Zoe and Jeffs — the proportions are based on their original recipe, with the major change being the flours. This relies on only about 25% starch for the texture: considerably less than the minimum of 50% that many other gluten-free breads require to achieve a pleasant texture. The other addition here that is critical, is the inclusion of sweet rice flour, which adds moisture and helps with the binding of the final flour.
A final note: I’ve given proportions in volume measures here. There is minimal mixing required for this approach, as the xantham gum hydrates slowly while the dough sits, and I’ve found that hydration levels are easy to adjust for as you go. I’ve tried both volume and weight measures, and had consistent results with both, so left the measures as volumes as many folks find them easier.
We’re making baguettes here today, but stay tuned to see what else we can make with this dough! We’re also sending this one over to Yeastspotting, go check out what some amazing bread bakers have been up to!!!
Whole “Grain” Gluten-free, Egg-free Baguettes
(modified from Artisan Bread in 5 minutes per day)
- 2 tablespoons flax meal (I use golden flax seeds for their flavour)
- 1/3 cup warm water
- 1/2 cup tapioca starch
- 2/3 cup brown rice flour (make sure to use one that is very finely ground, not gritty)
- 1/3 cup sweet rice flour (also called “glutinous rice” or “sticky rice”)
- 1/2 cup millet flour
- 1/2 cup amaranth flour
- 1/2 cup sorghum flour
- 1 Tablespoon instant yeast
- 1 1/2 teaspoons sea salt
- 1 Tablespoon Xantham gum
- 2 cups warm water
- 3 Tablespoons olive oil
- 1 Tablespoon honey or organic cane sugar
Mix together the flax meal and 1/3 cup water and set aside for 15 minutes until it becomes thick and gloppy.
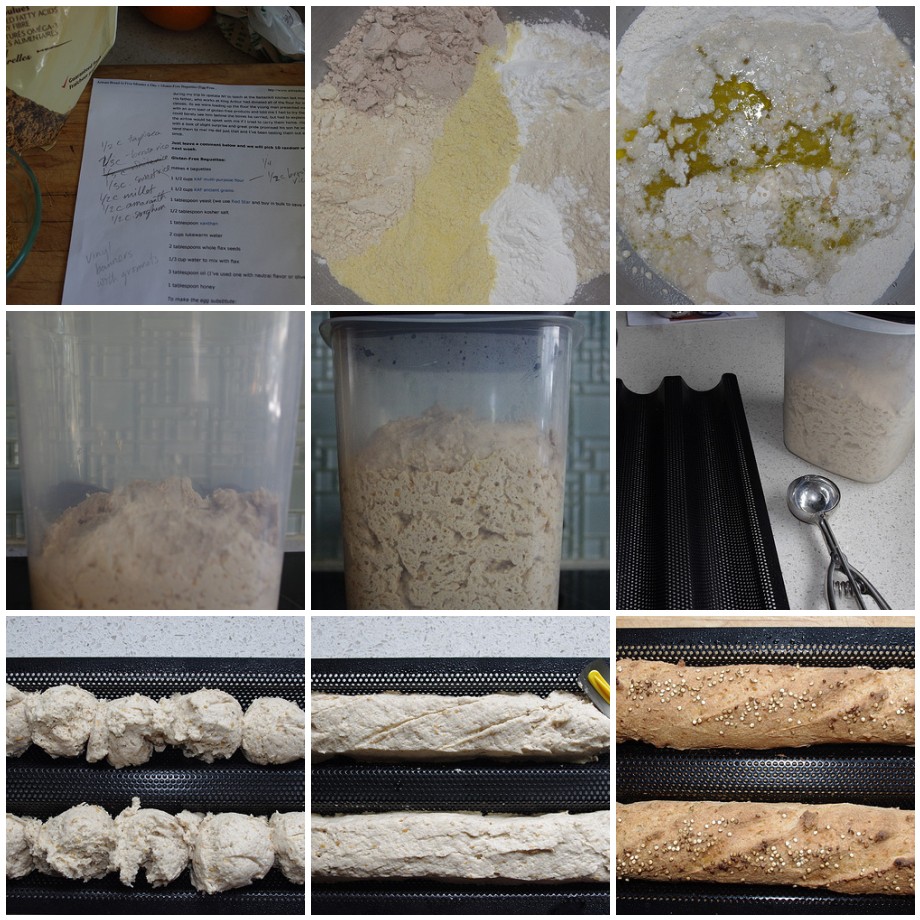
In a large bowl, mix together flours, yeast, salt, and xantham gum. Whisk well to combine all the ingredients (You do NOT want to have blobs of xantham gum!!!)
Add all the liquid ingredients to the dry ingredients and mix with a spatula until the dough is well mixed. Transfer the dough to a container with a loose fitting lid, and let rise for 1 1/2 – 2 hours until doubled in volume. The dough will be airier in texture than wheat-based dough. Store the dough in the refrigerator for up to 1 week.
To bake baguettes, preheat the oven to 450 degrees. Grease a baguette pan, or line with parchment paper. (You can do this on a heavy sheet pan, but the baguette pan allows for greater air circulation on all sides of the baguette — its all about the crusty exterior!!!)
To shape this dough, you want to handle it as little as possible. I’ve found the easiest way to form into baguettes is with a scoop, laying scoops of dough all in a row and then use a wet spatula or fingers to smooth out the scoops into a uniform baguette. Sprinkle seeds or gluten-free grains of your choice on top of the baguettes. Once you’ve formed the baguette, let it sit for about 30 minutes, to take the chill off the dough. It won’t double in size, but will have oven spring once it starts baking. You can also slash the top of the dough to control the rise, just be gentle when you do!
Bake at 450 degrees for 30-35 minutes. Let the baguettes cool completely before you try to cut them!


[...] This post was mentioned on Twitter by Janice Mansfield. Janice Mansfield said: NEW BLOG POST: #Glutenfree, vegan baguettes #gf http://ht.ly/26TBB [...]
I so have to try this, it sounds yummy thanks for doing all the work, I always have to make things egg and dairy free. A local bakery makes the most awesome gfree bread, he thinks is gfree but because he is a regular bakery there is always cross-contamination, anyway what I wanted to discuss was he using gelatin with his yeast. Wondering if you have tried this yet.
I sometimes use gelatin (or agar if I`m making a vegan bread) in gluten-free breads, both to boost the protein levels a wee bit, but also to add moisture and structure to the breads. The gluten in wheat breads actually gelatinizes at about 190 degrees, which helps with the structure of the bread. Many gluten-free breads make use of eggs to mimic this, but you can also use the gelatin when making an egg-free, gluten-free bread. It requires small amounts (only about a half teaspoon for every cup of flour)
MERCI POUR TOUS
[...] Gluten-Free Baguettes [...]
Hi, I ran across your blog in searching the net for gram/volume conversions for GF flours. After hitting lots of links, I finally found yours. Thanks for putting it together! And this bread looks great—I’ll try it after I get back from vacation next week. I already have the baguette pan, so I have a head start!
Mary
Hi again, I have made this bread several times now, and I think it’s one of the best GF breads I have made in 10 years. However, I wanted to let you know how it worked for me because there were a couple of problems at first.
I tweaked my first loaf by subbing more millet flour for the amaranth, since I didn’t have amaranth on hand, and I don’t really like the flavor. Otherwise, I made the bread as written. The crust was fabulously chewy and the flavor was great, but the texture was quite unpleasantly gummy and wet.
I played with it quite a bit after that because I really wanted to make it work and now on my fifth try, it’s just about perfect. I decided that it was probably the flax that was contributing to the gumminess, so I left that out, and I reduced the total liquid. I don’t have an exact measurement of the liquid I use, because I go more by the consistency of the batter/dough, but it probably works out to about 1-1/2 to 1-3/4 cups water total. My batch last night came out as close to perfect as GF bread can get.
I haven’t tried leaving the dough in the refrigerator, I just make two loaves at a time, because I can eat them within a couple of days! But that’s my next experiment.
Meanwhile, thanks again. I’m so glad to have found this recipe. There are a lot of GF bread recipes out there, and I’ve made a lot of them. Some a great, some not so great. But some of them are really complicated, like having two risings, and on and on. Yours is simple, easy, and I usually have bread in less than two hours! And it’s really yummy too.
Thanks so much for sharing your changes to the recipe Mary. I’m always tweaking with mine, whether different flours or alternatives to things like the flax seed. I’ve also made it with chia seeds which definitely make it gummier. The texture on my loaf is usually moist inside, but I haven’t had the gumminess, and I usually have it out for a few days. I am curious now, and will have to try with the proportions you ended up with. As for the amaranth, it is a stronger tasting flour — I happen to like it a lot, and even use it in chocolate chip cookies. One of the great things about gluten-free baking is there are so many options to choose from (if you dont like one flour, sub another!).