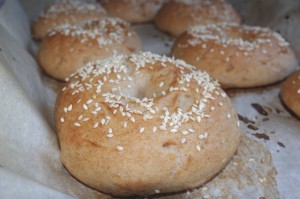
So I know I promised this to you a little while ago, but with Christmas and all, other baking had taken priority. Given a free day, with the husband and Shiba inus preoccupied outside on a sunny day, I set about with my scale, camera, pen and paper (yes, Virginia, people do still use pen and paper!) to document these bagels.
As you may recall, I’ve been trying for a while to get really good chewy gluten-free bagel going, and have found that even the recipes that contained eggs resulted in more fluffy bagels, rather than that chew and density that goes along with the Montreal style bagels. As I started playing around with wild yeast starters, I found that I was starting to see some of the texture I was after in the baguettes, especially when slow-risen overnight.
So with a wild-yeast starter in hand (I use a slight variation of Dr. Jean Layton’s sourdough starter and flour blend — I use a smaller amount of white bean flour, AND I also substitute half the sorghum flour for millet flour) — at 100% hydration levels.
When feeding my starter, I use equal parts of the gluten-free flour blend and water, usually about 1/2 cup of each. I whisk it well, and then add to the wild yeast starter I’ve had in the fridge. Before you feed your starter, let it warm up to room temperature (After all, YOU don’t like eating when you’re cold and sleepy, do you?!), and let it sit at room temperature after until you see lots of bubbles developing. About every third time I feed it, I also add about 1 1/2 teaspoons of potato flour to the mix.
Before using the wild yeast starter (or “hooch”), I find it is most effective if fed the day before or first thing in the morning before you use it. With wheat starter, the purpose of feeding (up to 3 days before), is to strengthen the gluten-structure of the starter, as well as to get the wild yeast perked up. With the gluten-free starter, obviously there is no worry about whether the gluten is happy or not, so its just a matter of waking up with the wild yeast and making sure its well fed and active.
A couple of things I’ve found help make gluten-free bagels that actually look like real bagels:
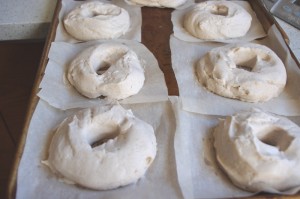
- the dough will be quite a bit thicker than most gluten-free bread doughs, but will still not be as firm as a wheat-based dough. Shaping the bagels is easiest done by piping them onto parchment paper with either a piping bag with a very large tip, OR with a ziploc bag with one corner cut out. Finish up the smoothing and shaping with wet fingers, and if you want the holes bigger, just stick it in the centre and swirl it around.
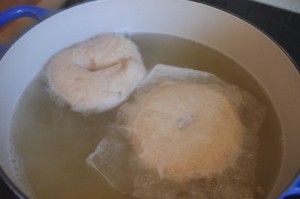
- Keep these on parchment paper right up to the point you boil them. I find it easiest to cut around the bagels, so each one is on a little square of parchment. That way you have a little “sling” to help get the bagels into the hot water bath. I put them in the water, parchment side down, flip them over, and then ease the parchment square off the bottom.
- These are more delicate than wheat-based bagels, so use a nice wide slotted spatula to fish them out of the hot water batch.
- Barley malt extract in the bagels and the water helps give wheat-based bagels their characteristic taste and sheen. The closest you will find that is gluten-free is Brown Rice syrup.
- Just like wheat-based bagels, bake these at high heat.
Printer friendly (GF wild yeast bagels)
Gluten-free Wild yeast bagels
Makes 7-8 medium sized bagels
-
- 450 grams gluten-free wild yeast or sourdough “hooch”
- 75 grams tapioca starch or potato starch
- 75 grams cornstarch
- 75 grams millet flour
- 38 grams sorghum flour
- 38 grams sweet rice flour
- 1 1/2 teaspoons sugar or honey
- 1/2 teaspoons salt
- 1 1/2 teaspoons guar gum
- 1 Tablespoon xantham gum
- 225 ml water
Combine all the dry ingredients in a medium bowl and mix well. Add the “hooch” and the water to the mixing bowl of a stand mixer. Add the dry ingredients and mix with the paddle attachment at medium speed for 4 minutes until the batter is very smooth.
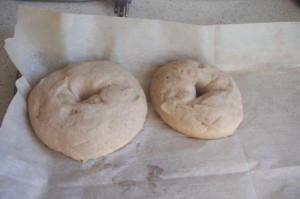
Put the batter into a piping bag (or alternately, you can use a large Ziploc bag with the corner cut out). Pipe out 7-8 bagels onto parchment paper (each one 3-4” across). Cover with plastic wrap and let rise in a cool place for at least 4 hours (or overnight in the fridge). Cut the parchment in squares around each bagel.
Preheat the oven to 450 degrees.
Prepare a water bath in a large dutch oven — bring the pot of water to the boil, and add 2 Tablespoons brown rice syrup. When the water boils, add 1 Tablespoon baking soda. Drop the bagels in the water (parchment side up — it will detach on its own). Boil briefly, 30 seconds per side, removing the parchment square as you take the bagels out of the water bath and remove to a parchment lined baking sheet. Sprinkle with seeds if desired.
Bake at 450 degrees for 20-25 minutes. Let cool on a baking rack before slicing open.
As with all things yeasty over here, we’re sending this over to YeastSpotting. Go check out all the fabulous things baked with yeast ![]()
4 Responses to A Gluten-free, Vegan Bagel (its a beautiful thing)
Leave a Reply Cancel reply
My latest Tweets
- Let the Lebowski quotes flow as freely as the White Russians! #yyj
- @ToriKlassen are you sitting already?
- Dude, if you have to ask!... (@ The Vic Theatre) http://t.co/3RnDGPt0
- @toriklassen you guys still at Clives? Lineup for Lebowski getting big!
- @jzinkewich I think there's a bunch heading down that way, myself included!


A vegan bagel?! Who woulda thunk! Looks great!!
Hi,
Came over from yeast spotting! These bagels look lovely. Of late I have been trying to bake gluten free breads as my daughter seems to be gluten intolerant. We are also vegan so the recipe comes as a boon. However, where I live, in India, we do not get tapioca or potato flour/starch. Can you please suggest a substitute for that? Also I found that my bread seems to rise well, bake well but collapses when it turns cold. Could you let me know where I am going wrong?
Thanks!
Hey there, They look fantastic Janice! I’m sure they are exactly what you were going for. Hope all is going well for you so far this year. Sorry for the late hello, but I’ld love to get together for a drink at Clives with you sometime soon.
Tara
Wonderful! I like the idea of more millet but found that it made the centers too tender for me. Glad you were able to make them.
I use just plain sugar in the boiling water for a great browning and sheen.
Jean