And sometimes, when the fruit is sooo perfect, it needs very little fussing about in order to capture all its glorious flavour and aroma! Old school European preserves fit the bill perfectly here
Our pantry is woefully lacking in jams at the moment, as Jeffrey pointed out a couple of weeks ago with a frown when rummaging about for something to put on his toast. So I guess this summer will involve more “putting up” fruit than I had originally intended.
If you plan to make preserves and jams and process the jars for storage on your pantry shelf, it does take a bit of planning to get things set up, but once its done there is NOTHING like opening a jar of something in the dead of winter that tastes like summer (remember that scene in Soylent Green, where he gets to take the spoon from the strawberry jam home?!)
This recipe-less recipe is for classic French-style strawberry preserves – which means the fruit is whole, suspended in a thick syrup. It’s a soft preserve rather than the heavily pectin-ed stuff you’ll find at the supermarket, and meant to be spooned onto scones, toast (or directly into one’s mouth ;)). We do make jams using mashed fruits and pectin (I prefer the texture of Pomona’s Pectin for those), but classic French style preserves are something extra special indeed!
This general method works with all manner of soft fruits – smaller fruits such as strawberries and cherries are left whole, larger fruits such as apricots or peaches can be cut into chunks. Because this method is done by weight, you can also take advantage of small harvests, to make impromptu batches of jams (and that means you can experiment with adding extra pops of flavour if you’re so inclined – a little lavender with your strawberries? a little coriander and allspice with your cherries? go for it!).
Before we get into it, a couple of points to remember:
- You may be tempted to skimp on the sugar – DON’T. For this type of preserve, the sugar is critical to getting your preserves to set, but more importantly, it helps prevent spoilage if you plan to keep them to use through the winter.
- Macerating the fruit in the sugar overnight may seem like a tedious, time consuming step, but it is an important step – don’t skip it! It serves 2 functions in this kind of jam – it helps extract the juices from the fruit, so they can be cooked to the “set” point separately (this helps with the texture of the syrup the fruit is suspended in), and second it impregnates the fruit with sugar, which helps each fruit retain its shape and texture even when cooked – without this step, the fruit will break apart as it cooks.

METHOD for preserves:
(for most fruits, a 1 quart basket will yield approx. 1 litre, or 4 250 ml jars of preserves)
- Pick over your berries to make sure you have smaller, bruise-free berries.
- Clean and hull them and weigh them out in a non-reactive (glass or stainless steel) bowl. Add in 75% of their weight in granulated sugar – e.g. if you have 1 kg cleaned berries, you will be using 750 grams sugar. Toss the berries gently with the sugar, cover the bowl and let the berries macerate overnight. You want the sugar to dissolve in the liquid the strawberries will exude.
- The next day, the juice of 1 lemon for every quart basket of berries you have used. Drain the syrup from the berries and place it over medium heat in a heavy bottomed saucepan or Dutch oven (use some thing that is wider than it is tall, but is tall enough to accommodate the jam as it boils up.
- Let the syrup cook until it hits the jam set-point (220F). At this point, add the berries into the pot. The temperature will drop – continue to cook the preserves until they reach 220 F again. If you don’t have a thermometer, you can use a cold saucer. a spoonful placed in the freezer for 1 minute will begin to firm up when it is ready.
- Remove from the heat and continue to stir gently, and skim the foam off as it cools.
- If you are processing your jars for longer term storage, now is the time to place in your (sterilized) jars with 2 piece lids, and process in a boiling water canning bath

Carrot cake with classic cream cheese frosting
Cream cheese frosting is one of those mainstays in a baker’s repertoire that we take for granted. Its a critical topping for some of those richer, flavour packed cakes like Carrot cake or Hummingbird cake, and some folks say for Red Velvet cake (I like to use a lighter “Ermine” frosting, but that is another blog post).
If you go on a search for Cream cheese frosting recipes, you will find most are pretty vague as to the method – which I find puzzling, as its one that most people have resigned themselves to something that tastes good, but has a gloppy, spreadable consistency rather than being perfectly pipeable. Most of the “fixes” you will see out there range from
- Adding less cream cheese and more butter – a less than optimal fix, since what’s cream cheese frosting without cream cheese!
- Adding more icing sugar to firm it up – also a less than optimal fix as it makes the cream cheese icing too sweet, dulling down the cream cheese flavour
- Beating for only a few seconds – also not ideal, since you end up with lumps of cream cheese in your frosting, which is not so attractive or practical when you are piping!
- Using only Philadelphia brand cream cheese – this one has some merit, but isn’t always ideal if another brand of cream cheese happens to be on a super-sale.
Given all of the above, and given I make quite a bit of cream cheese frosting each week, I thought I would share my proportions and method for making pretty bombproof cream cheese frosting that pipes like a dream. This doesn’t have a lot of sugar in it, and uses science to give you a bit of a buffer on the slump factor.
The fact is that even the best quality cream cheeses contain water, which when combined with confectioners sugar, seeks out the water molecules and bonds immediately causing a liquid – in technical terms, sugar is hydrospcopic. THIS is what causes your cream cheese frosting to get all weepy on you!
In order to circumvent this little bit of science, you need to add some fat into the mix to jam up the works, so to speak. By creaming the butter and confectioners sugar FIRST and very well, you effectively disrupt this natural affinity of the water in the cream cheese for the sugar molecules. If you do this first, you can then add your cream cheese, and still be able to beat it to a nice smooth, fluffy consistency. Here’s the process (and amounts to frost 1 9″ layer cake or 1 9×13 slab cake)
- 227 grams (1 cup) butter + 3 bricks (250 grams each, OR 750 grams total) full-fat (55% milk fat)cream cheese – do NOT use light cream cheese, it has too much water in it
- Make sure your butter and cream cheese are at room temperature!
- Place in a stand mixer with 2 cups of confectioners sugar and 1 tsp or so of vanilla extract. Beat at low speed until the sugar is mixed into the butter, then turn the mixer to medium speed and beat for 2-3 minutes until the mixture is light and fluffy (it will actually get near-white in colour). You may need to scrape the bowl of your mixer part way through to make sure the butter is fully incorporated.
- Cut the cream cheese into 1″ cubes and add in stages to the butter and sugar mixture. Beat at medium-low speed for about 1 minute, until the frosting is nice and smooth. Don’t beat beyond this point. Even with this method, it will become a bit runny if you overdo it!
- Load your frosting into a piping bag and frost away!
- If you are not going to use the frosting immediately, store in the fridge. Let it come back to room temperature before using.
- Happy piping!
 Bechamel sauce (or Sauce Béchamel if you are French) is one of those workhorses in the kitchen we tend to take for granted, until life throws a monkey-wrench into the works … like having to transition to a gluten-free diet!
Its a classic in the French culinary world, having first been codified by Auguste Escoffier in 1903 in Le Guide Culinaire, and deemed one the 5 mother sauces that form the basis of Haute Cuisine.
Bechamel at its core is simply a dairy-based sauce, thickened with a flour that has been cooked so the starch molecules absorb liquid and swell. Bechamel can have herbs or spices added – the classic Escoffier recipe calls for an onion studded with clove, but bay and nutmeg are also classic flavourings. The food geek in me would like to point out it is the starch that gives Bechamel its texture, NOT the gluten, therefore replicating the results is an easier task than you might have assumed.
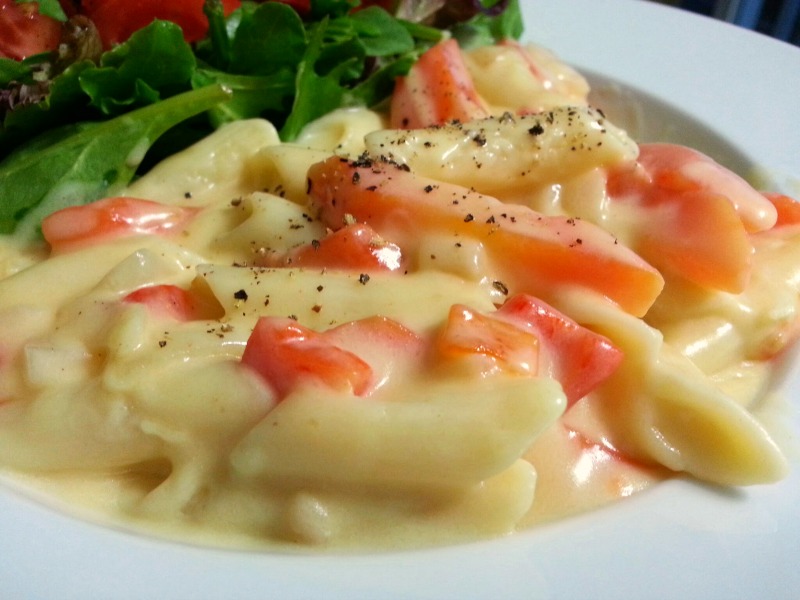
- Add cheese and you have a Mornay sauce which makes a great way to get kids to eat broccoli, but also forms the base of homemade mac & cheese.
- Add some mustard and herbs and fold in a goodly amount of vegetables and top with breadcrumbs … voila you have a gratin!
- Stir in some egg yolks to the cooked Bechamel with whatever you please, and fold in the whipped egg whites and bake, and you have a souffle
- Use it to bind leftover mashed potatoes and fish or chopped chicken, or ham and roll in some breadcrumbs and you have croquettes
- Add a splash of wine before you add the milk, and Fold in some chicken and vegetables, and you have a quick pot-pie filling.
- Start with sausage meat and use the drippings as your fat, and fold in the sausage meat at the end and you have biscuits and gravy!
Anyway, you get the idea, the sauce is as versatile as your imagination! But traditionally it is made with wheat flour: equal weights of flour and butter, with milk stirred in, with the flour weighing about 10% of the milk. (For those of you who have made bread using the Tangzhong method … notice anything familiar there?!)
The good news is that this is one of those cases where method and technique can be applied quite well with gluten-free flours! Some flours are better suited to bechamel than others, mainly because of mouthfeel once the starches have cooked, but I’ve successfully made bechamel out of most of the flours from the grain family, and also used legume flours in a pinch. I do find also that gluten-free flours aren’t quite as sticky as wheat flour, so take a little more than with wheat flour to get the desired consistency.
My Ratio for Gluten-free Bechamel
- 1 T + 1 tsp gluten-free flour
- 1 T butter or fat
- 1 cup of milk
Top 5 flours I like to use to make Gluten-free Bechamel:
1. Sweet rice flour
2. Raw buckwheat flour (you can make this by blitzing raw buckwheat groats in a coffee grinder)
3. Masa harina
4. Sorghum flour
5. Millet flour flour
But this doesn’t mean you can’t use for example, brown rice flour – just make sure to cook the sauce a few minutes longer if you are using any of the whole grain flours, otherwise they will be gummy and unappetizing b/c the starches take longer to hydrate.
Some people like to use starches such as cornstarch or tapioca starch – these will also work, but give too slick a texture IMO (more like fruit pie filling than sauce)
Method:
Turn your burner to medium heat, and melt the butter or oil in a small saucepan. Add the flour, and stir to ensure the flour is fully coated with the oil.
Continue to stir until the roux begins to dry out a bit and just starts to become golden, about 3-5 minutes.
Add 1/4 of the milk, stirring well to loosen the roux. The mixture will begin to thicken into a paste as it heats up. Stir in the remaining milk and mix well with a whisk, stirring to avoid clumps forming.
Continue to whisk as the mixture thickens. It will be ready when your whisk leaves “tracks” in the sauce. If you are adding cheese, turn the heat to low, and add grated cheese gradually until it is melted.
A note on freezing
Bechamel forms the basis of many dishes that are great to prepare in larger batches and freeze! There are a few of the gluten-free flours, however, that do not freeze well, losing their viscosity and binding properties after freezing and thawing – the cell walls actually rupture, causing your sauces to break and weep (not an attractive quality).
The 2 main culprits are rice flours and potato starch/flour – Generally if I’m making something bound for the freezer, I avoid rice as a thickener (also note that rice-based pastas will disintegrate on freezing and thawing) and stick with the corn, sorghum or buckwheat
]]>
Since the (soldered in!) battery in our programmable rice cooker is pooched, we're back to cooking rice the old-fashioned way here at the Shiba Shack! It's not a hardship by any stretch of the imagination, but not as convenient as pushing a button on the rice cooker. Nonetheless, I'm always surprised by the number of poeple who are intimidated by the thought of cooking rice.
Anyhoo, we happen to like basmati rice here, and there are a couple of small steps you can take to make sure your rice comes out perfect every time.
1. Soak your rice ahead of time. for about 20 minutes. This does a couple of things: it hydrates the rice sufficiently that it cooks evenly; and it washes off some of the surface starch that causes the rice grains to stick together
2. Water =1.5X the volume of rice you use
3. Use a pot that isn't too big! for up to 2C of rice, I use this 3 quart heavy-bottomed saucepan
4. Bring the water and soaked rice to a rapid boil and quickly lower the heat to the lowest setting on your stovetop
5. put a tea towel (or paper towel) between the lid and the pot. This helps keep ALL the steam inside the pot, which makes for a nice fluffy texture
on my stove, I cook for 12 mins, turn the heat off and let stand another 10
This post has been reshared 4 times on Google+
View this post on Google+
 If you are looking for a fast dinner option that is relatively inexpensive, and can be gussied up any number of ways, look no further than sole! Here on the West Coast of BC, its fished year-round, making it a local, fresh (not frozen) fish option.
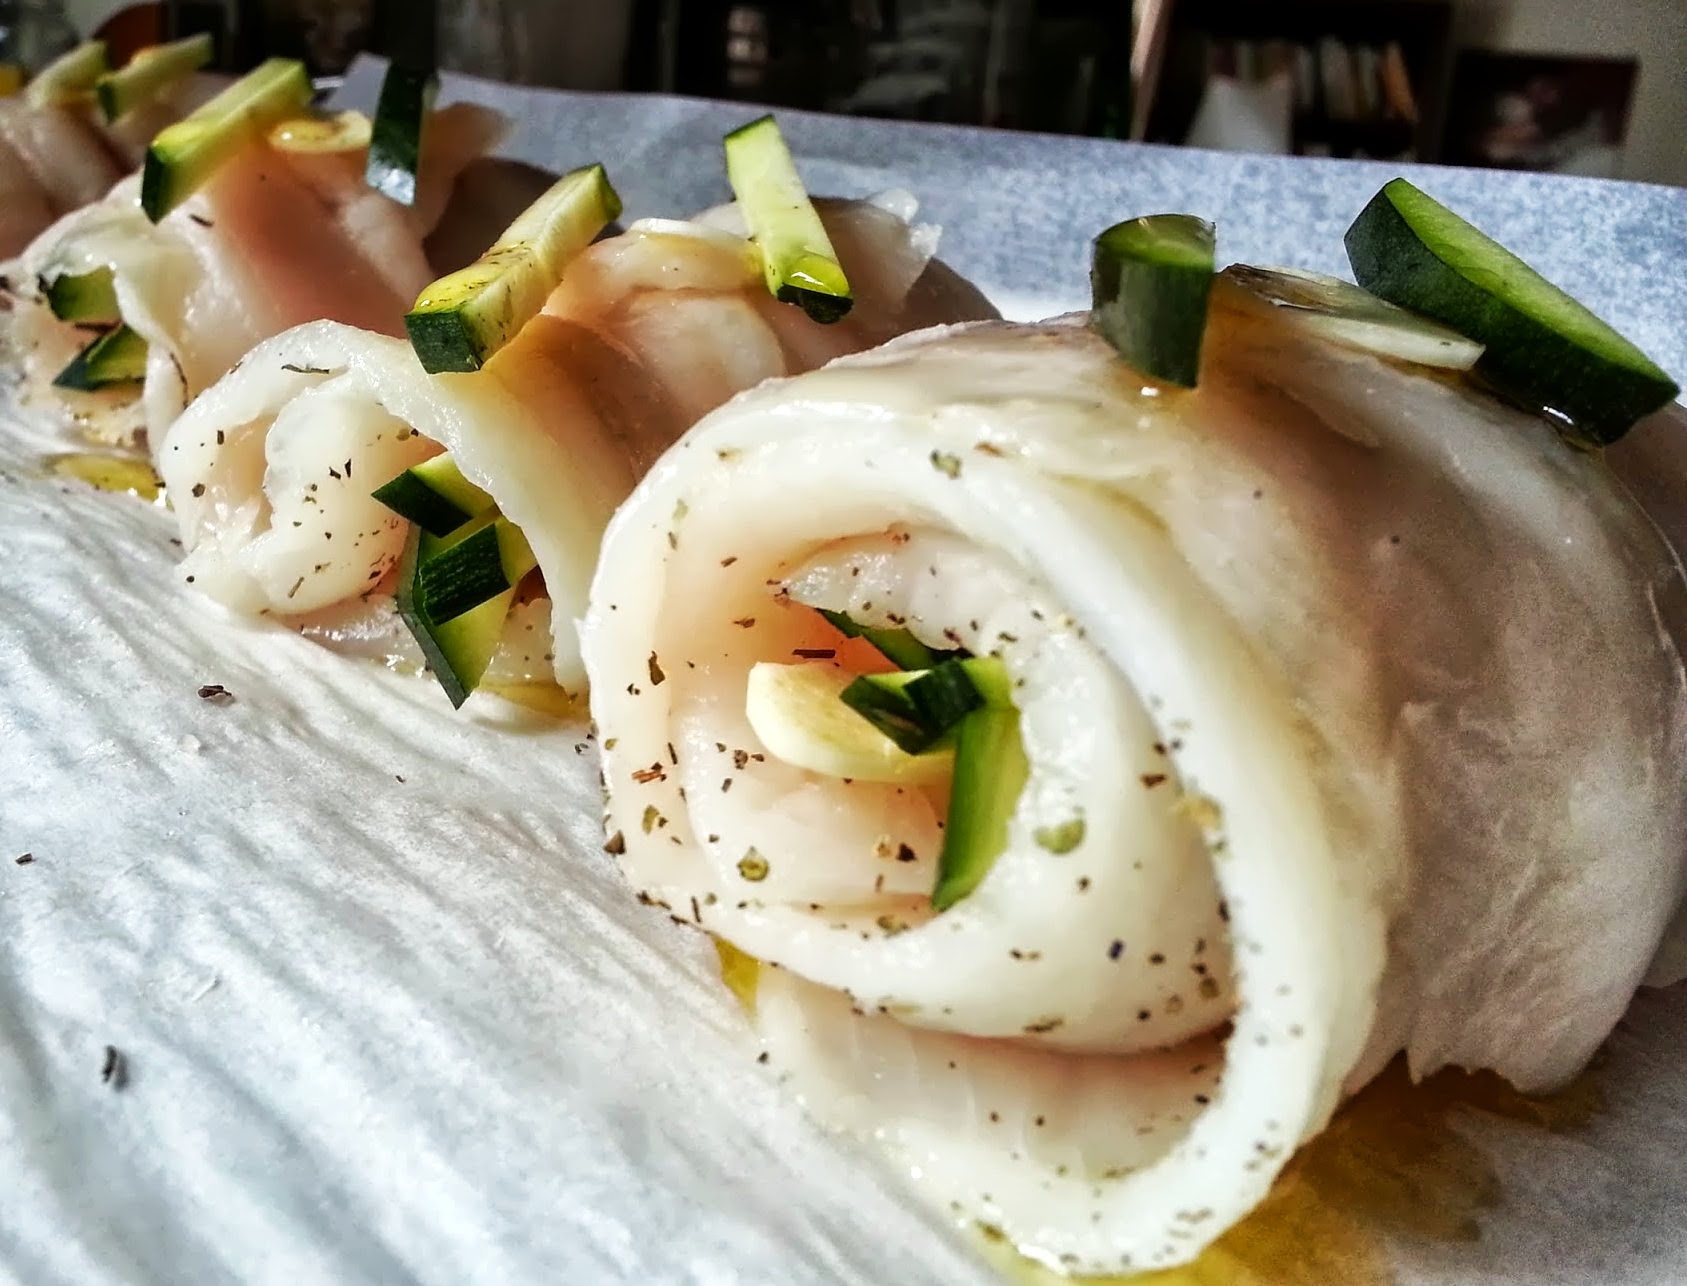
It comes in flat fillets that are really easy to roll up with all kinds of fillings, and once prepared, it takes only about 10 minutes to cook in the oven at 375 – 400 degrees. You can do double-duty in the oven, and roast some vegetables such as carrots or zucchini with onions, garlic, olive oil and seasoning, and then use the cooked vegetables as filling! OR, you can make a spinach-ricotta filling, OR caramelized onion and peppers … the possibilities are limited only by your imagination. Because the sole is such a mild flavoured fish, it serves as a backdrop for all kinds of flavours.
Just remember when you lay out your fish fillets, lay them with the spine-side up (its easy to spot, as its much smoother than the outer side) – you won’t need any toothpicks as the proteins in the fish contract more along the spine side, making the roll even tighter once it cooks! Self Sealing! Bake on parchment at 400F for 10-13 minutes.
You can see these ones were rolled up with zucchini and garlic slivers, seasoned with salt, pepper and a dusting of Herbs de Provence, drizzled with olive oil.
Let me know in the comments below what fillings you like to pair with your sole fillets! I’m also thinking about doing a video demo on how to roll these up – link will be posted here if I do.
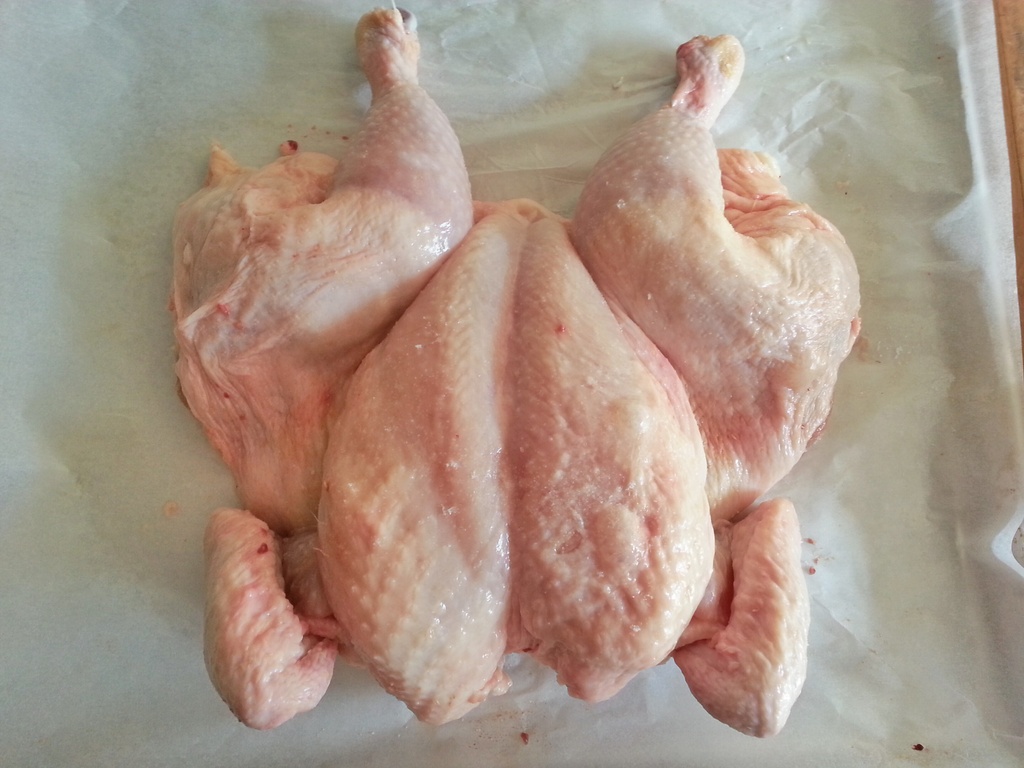
Cut the backbone out of a chicken, flatten it and season it and you’ve just done 2 things:
1) increased the surface area for crispy skin!!!!
2) cut the amount of time it takes to roast a chicken to 35-45 minutes!!!
400 degrees on a sheet pan! and there’s usually room for potatoes or other veg 
This post has been reshared 4 times on Google+
View this post on Google+
 its cookalong time, and this month over on Google+, Shinae Robinson organized an African Food Cookalong.
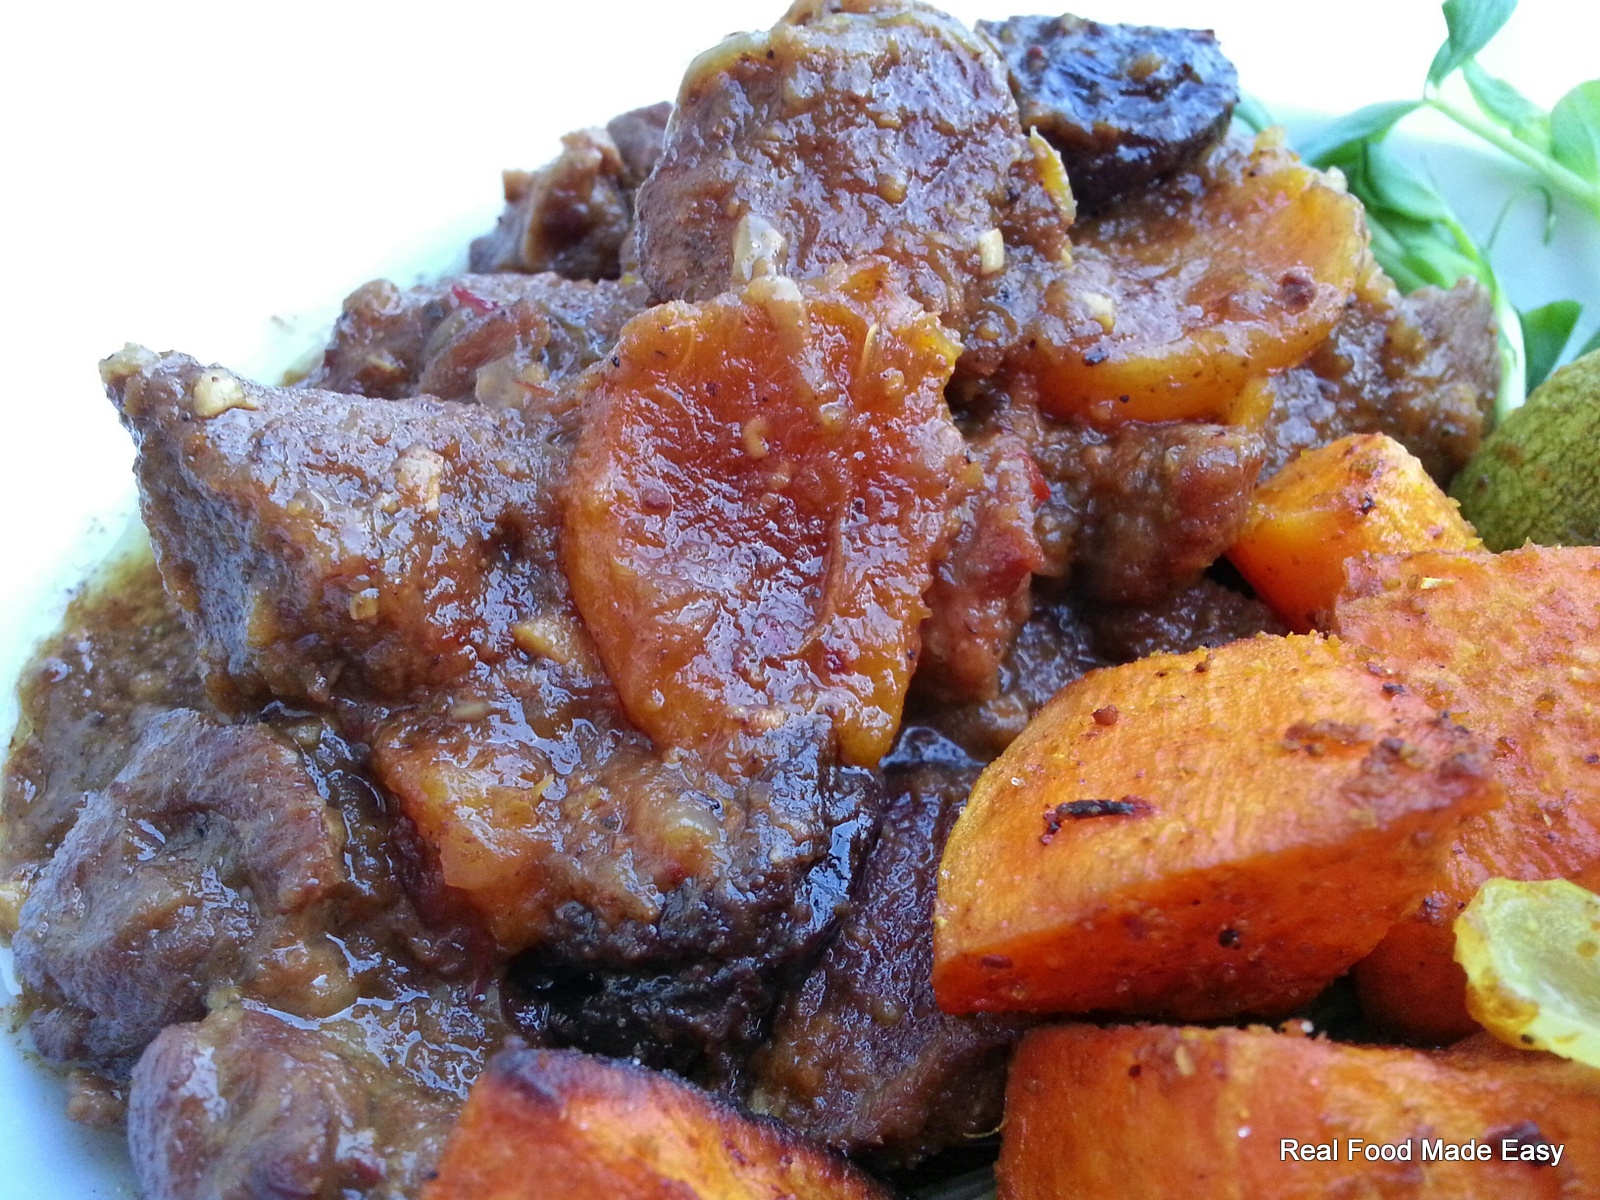
These cookalongs run for the week (Sunday-Saturday), and are a great way to try cooking something a little different than your usual fare, and check in and see how others are going about it! This month’s endeavour was African food, and because Jeffrey has developed a sensitivity to peanuts, I decided not to make the groundnut stew, but do a tagine and roasted vegetables. There was a chicken and a vegetable tagine recipe for the cookalong, but wouldn’t you know it, when I stopped in the supermarket the day before, there was a lovely lamb shoulder roast that had been drastically marked down!!! Clearly, we were meant to be eating lamb tagine ;).
Tagines are traditionally slow cooked in an earthenware covered dish with a conical lid that keeps the juices in the braise circulating, BUT because it is really nothing more than a braise, you can produce great results in a dutch oven, or even a pressure cooker. The trick is to make sure your pot keeps the delicious juices inside. We did ours in the pressure cooker for about 45 minutes to break down the tougher pieces in the lamb shoulder. This would take about 2 1/2 hours in a 275 degree oven.
The method for this is pretty straightforward, and the same method you would use for any stew. You can see the ingredients for the tagine are actually fairly simple – this is about taking the time to develop the flavours at every stage of the braise.
- Cut and season your protein (lamb in this case).
- Take the time to brown the meat – don’t crowd the pan otherwise it will boil, not brown (yuk!)
- Reduce heat and add the onions (and other aromatics if you are using them). Cook until the onions are soft and have some colour on them.
- Add spices if you are using them (wait to add herbs). This lets them toast a little bit, drawing out maximum flavour
- Add your meat back, along with any juices.
- Add your liquid, making sure to scrape any fond (brown bits) into the liquid.
- Add your vegetables
- Cook low and slow until the meat is tender. if you are using an inexpensive cut with a lot of connective tissue, this will take a while! Kick back with a cocktail or a glass of wine while its burbling away.
- Finish with a thickener if you are using one, and give your stew a final seasoning if needed.
Ingredients
- 1 tsp aniseed
- 1 tsp fennel seeds
- 1 tsp whole allspice berries
- 10 whole green cardamom pods
- 1 black cardamom pod
- 1/2 tsp whole cloves
- 1 tsp whole white peppercorns
- 1 whole cinnamon stick (if you can find true cinnamon, use this!)
- 2 tsp whole coriander seeds
- 1 tsp whole cumin seeds
- 1 tablespoon ground ginger
- 2 blades dried mace
- 1 Tablespoon fenugreek seeds
- 1/2 tsp dried lavender flowers OR 1 large dried rosebud
- 1 bayleaf (remove the rib before adding to your spice grinder)
Instructions
- Place all ingredients in a spice blender and blend until the spices are pulverized and a uniform texture. Pass through a fine mesh sieve and store in an airtight jar.
Ingredients
- 2-3 lbs lamb shoulder
- salt to taste
- 2-3 T olive oil
- 2 medium onions (about 3 cups sliced pole-pole)
- 3-4 cloves garlic, minced
- 2 T Ras el Hanout
- 1 cinnamon stick
- 1 large bay leaf
- 1/2 tsp saffron
- 1 1/2 cup water
- 1/2 cup dried apricots (about 12-13)
- 1/2 cup dried prunes
Instructions
- cut the lamb shoulder into cubes (approx 3/4"- 1")
- season the lamb pieces with salt and pepper
- Heat the olive oil in the bottom of a Dutch oven or pressure cooker - medium-high heat.
- Brown the meat on all sides. You will probably have to do this in 2 batches. After the meat is browned, empty the pot, add 1 T more oil if necessary, and lower the heat to medium.
- Add the onions and a pinch of salt, and cook, stirring occasionally until the onions are softened and beginning to brown.
- Add the garlic, and the Ras el Hanout, and cook for another 1-2 minutes until you can smell the spices beginning to toast.
- Add the meat back to the pot, along with the cinnamon stick, bay leaf, saffron and water, stirring well to pick up any browned bits off the bottom of the pot. Add the apricots, and cover the pot.
- If using a pressure cooker, bring up to pressure and cook for 35 minutes. If using the oven, put the Dutch oven in a preheated 275 degree oven and cook for 2 hours, covered (also check to see if more water is required)
- After the initial cook, open the pot and give everything a stir, and add the prunes to the top of the pot. Put the lid back on a cook for another 10 minutes in the pressure cooker or another 30 minutes in the oven.
- Check for doneness, adjust seasoning if needed, and finish, stirring on the heat for 3-4 minutes.
- Serve over couscous, or for a gluten-free option, serve over rice or whole sorghum, with roasted vegetables on the side. Garnish with toasted chopped almonds and sliced green onions
Ingredients
- 1 large yam, peeled and diced
- 1 Zucchini, diced
- 2 large carrots, diced
- 2 small onions, each cut into 8 wedges
- 3 garlic cloves, sliced
- 1/2 lemon, cut into 1/4" dice, peel and all
- salt
- pepper
- 2 T olive oil
- 2 T balsamic vinegar
- 1 tsp Ras el Hanout
- 1 tsp ground cumin
- 1 tsp ground coriander
- 1/2 tsp ground tumeric
Instructions
- Preheat oven to 400 degrees
- Place all vegetables in a large bowl with the spices, salt, olive oil and vinegar.
- Toss to thoroughly combine everything and evenly coat the vegetables
- Place on a parchment-lined baking sheet
- Bake for 40-45 minutes. Stir once while the vegetables are roasting.
there’s still a few days left in the cookalong! if you give it a try, make sure to post pictures on the event page and/or tag it with #sfpcookalong13!
]]>
 No matter how much time I spend in the kitchen or how many new tools I get to try out, there are a few things I fall back on as “essential tools”1) microplane – I use mine for everything from lemon zest to grating nutmeg, to creating parmesan “snow”
2) a good knife that fits your hand! doesn’t need to have a price tag that breaks the bank, but should be good enough quality that it holds a decent edge. Most importantly, it should fit your hand! If you are on a budget, get yourself an 8″ or 10″ chefs knife or Santoku, and a paring knife to start.
3) my hinged citrus juicer! (sometimes referred to by bartenders as a Mexican elbow). This does the most efficient job bar none of extracting juice from all kinds of citrus
4) French rolling pin – for rolling pastry, nothing beats the effectiveness of this simple design. You can also use it to pound meat in a pinch, crush nuts, or soften blocks of butter!
5) parchment sheets! I buy these by the box, and use them for lining sheet pans for roasting all kinds of things, but also cut them in circles to line cake pans, fold them to make collars for assembling cakes or circling souffes. You can also use 2 layers to roll out sticky pastries (very handy with gluten-free baking!) … and in a pinch, they can also be deployed into a piping bag.
What are your kitchen “must-haves”?
#kitchentips #blog
Post imported by Google+Blog for WordPress.
]]>Burger papers are one of those things! Yes, those little 5.25″ x 5.25″ square sheets of parchment that you can buy for next to nothing at the restaurant supply warehouse! I always have a box in the pantry for everything from wrapping caramels, to providing a clean base for the top of my scale, to separating fresh baked goods so they don’t stick together, to yes … even the mundane task of separating burger patties!
One of the recent burger paper hacks I’ve been employing lately is as a stand-in for muffin papers. You can buy the standard muffin cups with the accordion edges, but you really need to shell out for the better quality ones to bake gluten-free muffins in — otherwise they stick like nobody’s business. AND they look a little pedestrian and “homemade”. More recently, the fancier tulip papers have come on the market and become more widely available, BUT if you are consuming a lot of muffins, the costs add up. A few months back, it struck me that these were really nothing more than parchment squares folded up. And so, the DIY parchment muffin cup was born from burger paper squares!
To make this dead easy, find a cup (I found these disposable plastic cups fit PERFECTLY in a standard muffin tin!), turn it upside-down, place 2 papers slightly offset (you need 2 papers to make a stable enough cup to contain the muffin and propel its doughy rise upwards in the oven) on top of the base of the cup, and simply gather the paper around the cup with your hands to fold and crease it into shape …
… VOILA! you have a muffin paper! Simply place it in your muffin tin, fill with your favourite muffin batter, and bake away! These are greaseproof, and non-stick, and peel very easily away from even the stickiest of gluten-free muffins!
]]> I developed this gluten-free pie crust a while back after I had a client who requested pie after many years of deprivation. My standby gluten-free crust recipe contained brown rice flour, BUT she was unable to eat rice, so some improvisation ensued.
I ultimately chose to go with amaranth flour as the dominant flour in the crust, and liked it so much I’ve made the switch in my standby recipe.
This is a fairly versatile “short pastry” — omit the sugar, and it works well for savoury pies.
If you would like a slightly more easy to work with crust, make this up in the food processor. I have found that making it by hand with a pastry blender results in a flakier crust. Despite the fact that it is gluten-free, resist the urge to overwork this, as adding too much additional flour during rolling will make the final product tough.
Throughout the summer, I use this pastry to make seasonal fruit tarts (such as the one pictured). For approximately 10-12 small tarts, I merely use a filling of about 500 ml low sugar jam (my own, homemade), combined with chopped raw fruit, spooned into unbaked tart shells and baked at 425 degrees for about 25 minutes until bubbling. The tarts shown were low sugar strawberry jam combined with chopped rhubarb. The strawberry jam had been made quite loose in case I wanted to use it for sauce, so I stirred in 1.5 T tapioca starch into the jam before adding the rhubarb. The tapioca thickens and sets as it heats up. The only other trick is to place the baking sheet with the tart shells on the bottom rack so that the bottom of the tart crusts become nicely browned.
Ingredients
- 1 cup amaranth flour
- 1 cup tapioca starch
- 1 cup cornstarch (or potato starch)
- 2 Tablespoons granulated sugar (omit if making savoury crust)
- 1 1/2 teaspoons baking powder (optional)
- 1 1/2 Tablespoons xantham gum
- 1 1/2 teaspoons sea salt
- 1 1/2 cups butter or shortening, cut in small pieces
- 1 egg (or 1/4 water if making eggless)
- 2 teaspoons cider vinegar
Instructions
- Combine all the dry ingredients in a medium bowl and mix well. Cut in the butter or shortening with a pastry blender until the mixture resembles dry oatmeal. Combine the egg and vinegar, and add slowly to the mixture until the pastry is moistened.
- If making in the food processor, combine all dry ingredients and pulse to mix well. Add the butter or shortening, and pulse until the mixture resembles oatmeal. Add the liquid ingredients slowly, pulsing until the mixture comes together in a ball.
- Form into a ball and cover with plastic wrap Let it rest in the refrigerator for at least 30 minutes before rolling out.
- When rolling, dust the surface with amaranth flour. It is easiest to roll out on a silicone mat, or between two sheets of plastic wrap.