This particular recipe began life as a Rose Levy Berenbaum recipe (she is a baking genius! if you don't have her books, you should!). It has become the brown-sugar cake base that was used for THIS Persimmon Upside-Down cake.
I'll be talking at more length about my process in a longer blog post tomorrow
#blog ?
This post has been reshared 1 times on Google+
View this post on Google+
This makes up a lot of shepherd’s pie filling, so scale it up or down accordingly. budget approximately 1/2 a potato per serving of shepherd’s pie.
A couple of tips to make your shepherd’s pie perfect:
1. use the widest pan you can find to allow the meat to brown. This will also make the sauce thicken up more quickly
2. Steam your potatoes for the mashed potato topping, and run them through your ricer or food mill, and then stir in the butter and half and half. You can also lighten your mashed potatoes by using buttermilk or chicken stock instead of the half and half.
3. If you are doing these as individual portions you plan to freeze, use a piping bag to pipe the mashed potatoes on top (it makes the layer nice and even and is much quicker).
4. this is a great way to use up seasonal produce – whatever produce you happen to have out of the garden or from the market. Beans and zucchini are a nice addition at this time of year.

Ingredients
- 2 T olive oil
- 3 lbs ground beef
- 4 cups onions, diced
- 2 cups celery, diced
- 4 cups carrots, diced
- 6 cloves garlic, minced
- 2 T Herbs de Provence
- 2 bay leaves
- 2 tsp salt
- 1 tsp black pepper
- 1/2 cup tomato sauce
- 2 T fish sauce
- 2 T gluten-free Worchestershire sauce or Balsamic vinegar
- 1 - 1 1/2 cups water
- 2 c frozen peas
- 1/4 cup buckwheat flour
- 6 russet potatoes
- 4 T butter
- 1 1/2 cups half and half
- 1/2 cup smoked cheddar (optional)
Instructions
- Heat the oil in a large Dutch oven over medium heat. Saute the onions until translucent and lightly browned, about 5-10 minutes.
- Add the garlic, and sweat about 30 minutes then add the celery and onions and saute another 5 minutes. Add the meat, salting as you go, and breaking up the meat as it browns.
- Add the Herbs de Provence, tomato sauce, fish sauce and Worchestershire sauce and water, and stir to mix. Add the bayleaf, cover the pot and reduce the heat and let simmer for 10 minutes until the carrots are cooked through.
- Add the frozen peas, turn the heat back up to medium-high and let cook until the peas are thawed. Then sprinkle the buckwheat flour on top and stir into the mixture, stirring as the filling heats up. It will thicken as it comes to the boil. Once thickened, remove from the heat and let cool slightly while you make the mashed potatoes.
- Preheat oven to 375 F
- Peel and cut the potatoes into large pieces. Place in a steamer basket and steam for 15-20 minutes until you can easily pierce the pieces with a paring knife. Alternately, you can boil the potatoes and drain them.
- Put the potatoes through a food mill or potato ricer. if you put the butter at the bottom of the pot or bowl you are making the mashed potatoes in, the butter will be melted by the time you are ready to stir the mashed potatoes.
- Add salt and pepper, and stir in the melted butter and half and half. if you are using smoked cheddar cheese, this is the time to add it. Dot the top with butter or sprinkle with more cheese.
- Place the filling in a pie plate, and top with mashed potatoes. Bake at 375 for 20 minutes until the filling is bubbling. Finish the shepherd's pie under the broiler to brown the top.
]]>
Most people think of cherries as dessert fare, but with their slight tartness, they also pair nicely in savoury dishes – incorporated into rice pilaf with pistachios, providing a bright note in stuffings, or turned into a simple pan sauce as we’ve done here with our salmon.
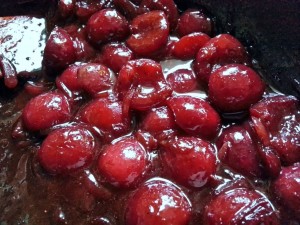
As an aside, much of the area in our neck of the woods was orchard back in the day. Most larger parcels of land were converted to suburban subdivisions back in the late 1960s/early 1970s, but the fruit trees remained in many back yards. I can remember sneaking over fences – blood pounding in the ears – to pluck the cherries from their branches, still warm from the sun and devour them on the spot! Tree-ripened cherries are a delicious thing, but there is an extra thrill in devouring forbidden fruit!
We’ve paired this sauce with a simple pan-fried salmon filet here, dusted with sumac and coriander, but it would also pair well with pork or chicken! A little something different to jazz up your summertime dinner.
[gard alight=”center”]

Ingredients
- 1 shallot, finely julienned
- 1 clove garlic, minced
- 1 cup cherries, pitted and halved
- 1-2 T balsamic vinegar
- 1 tsp ground coriander
- 1 T sugar
- salt
- 1 cup liquid (water, stock, whatever is on hand!)
- 2 T butter to finish the sauce
Instructions
- Use the same pan you saute your fish (or pork or chicken) in. The browned bits will help flavour your pan sauce.
- Over medium-high heat, saute the shallots and garlic with a pinch of salt until soft and translucent.
- Add the cherries to the pan and saute until the cherries start to soften and release some of their juice.
- Add the remaining ingredients except for the butter and lower the heat to simmer until the cherries are very soft and the liquid have reduced to about 1/4-1/2 cup. Adjust seasoning as needed.
- Swirl in the butter to finish the sauce, making sure you keep the pan moving.
]]>
It seems everyone is an expert on food these days! Whether they’ve read the latest book on wheat and can espouse to you how its more evil than Satan himself, or there is handwringing about corn, or angst about conditions for chickens, or pigs, or the evils of eating meat, or people going all paleo, it seems everyone has an opinion about food these days! I don’t know if its just me hitting my crotchety middle years, but those opinions seem to be getting more and more antagonistic!
Food should be something that unites us! I know we all want to be special, and food seems to be one of those defining things these days. Perhaps its because fashion is more widely accessible, perhaps its because anybody can buy granite countertops for their kitchens at Home Depot, that diet and food are becoming the new “thing that makes us unique”! I think it was William Gibson in one of his recent novels who put forward the idea of scarcity and difficult-to-find being the hallmark of the luxury “class”. After all, just how special IS your Hermes scarf if just anyone can walk in, plunk down some moola and acquire it.
Don’t get me wrong, I cook and bake gluten-free for Christ’s sake, and I go to great lengths to ensure that what I make is safe for my celiac customers. But, that being said, there is an element of the current gluten-free mania, spurred mainly by pop-culture non-fiction books, that is sweeping the nation! And people seem to be headed in a more and more restrictive diet direction. Food seems to be becoming the new ascetisim and definition of character! … and it comes with its own paint-by-numbers templates, with cookbooks and blogs abounding telling us what to do and what to think about our food, and how to properly embrace these aspirational lifestyles (yes, I am fully aware of the irony of this statement as I type it … on my blog)
[GARD align=center]
In my opinion, food has become far more complicated than it ever needs to be for 95% of us! There was a time when people cooked three square meals a day. Food was simple, nourishing, made from scratch, and usually made without recipes! It seems we have lost our way somewhere. We’ve lost our understanding of cooking methods and techniques that allow us to look at what’s in the fridge or the garden, and come up with dinner! The fact is, when I’m cooking (as opposed to baking), I seldom use a recipe, but I do use some general methods and guidelines in terms of proportions (e.g. brown=flavour, 1 T flour will generally thicken 1 c liquid).
I think its time to take back the simplicity of food! After all, shouldn’t we just be able to enjoy some potato salad without being wracked with guilt?! </rant>
And so, dear reader, I’m thinking of starting a series of blog posts highlighting different ways of cooking things! There are only so many ways of applying heat to things to cook them, and each one of those methods has its advantages and will draw out, or transform the flavours of food in different ways! (think bake = dry heat, boil = wet heat, you get the picture). This is really helpful stuff to know if you are getting really tired of the same old pan-fried chicken breasts for dinner! or if you find yourself without a stovetop, or oven for a period of time! Try a braise next time, or poaching your chicken breasts in some stock with a bit of vermouth.

Here’s a simple one to start you off, and its perfect summertime fare because you can make up a batch of it and get out of the kitchen!
This potato salad was an impromptu add-on to our meal last night. I’ve been craving potato salad after ingesting some horrendous stuff from the supermarket last weekend on a whim (#protip – never grocery shop hungry!). As I passed by the new potatoes at the greengrocer last night, I remembered I still hadn’t had any decent potato salad, so I picked out some of the potatoes. I also happen to like dill in my potato salad, and as I was picking out a bunch, this little ladybug was perched on top — the cute factor kind of sealed the deal.
Today’s cooking method is STEAM. I know all your recipe books tell you to boil your potatoes for potato salad and mashed potatoes. I’m telling you, steam is a much gentler way of cooking your potatoes evenly, and keeping them intact! You’ll find the texture is much better as well. Boiling is such a violent way of cooking something that is really just starch molecules holding onto each other for dear life!
And in keeping with the talk of methods, think of this recipe as guidelines, not rules! If you want to add something crunchy to it like bell peppers go for it, don’t like garlic? leave it out! Because potato salad should be easy

Ingredients
- 5-6 large new potatoes, cut in 1" dice
- 3-4 green onions, sliced
- 1 garlic clove, minced
- 1 celery rib, small dice
- 1/4 cup or so chopped pickled beans (pickles also work, use whatever tart notes YOU like!)
- 2-3 T mayonnaise
- 2-3 T sour cream
- salt and pepper
- 2 T or so fresh herbs (I like dill, chervil is also very nice, summer savoury)
Instructions
- if you are using new potatoes, just cut and place in a steamer basket. If you are not using new potatoes, try and pick something a little less starchy - red-skinned wax potatoes or Yukon golds are nice.
- Steam the potatoes 10-15 minutes until you can piece them through with a paring knife. Steaming cooks them evenly while letting them retain their shape!
- While the potatoes are still hot, place them in a bowl with everything except the mayonnaise and sour cream, and toss to let the flavours intermingle.
- When the potatoes are cool to the touch, add the mayonnaise and sour cream and toss thoroughly to combine.
Since the (soldered in!) battery in our programmable rice cooker is pooched, we're back to cooking rice the old-fashioned way here at the Shiba Shack! It's not a hardship by any stretch of the imagination, but not as convenient as pushing a button on the rice cooker. Nonetheless, I'm always surprised by the number of poeple who are intimidated by the thought of cooking rice.
Anyhoo, we happen to like basmati rice here, and there are a couple of small steps you can take to make sure your rice comes out perfect every time.
1. Soak your rice ahead of time. for about 20 minutes. This does a couple of things: it hydrates the rice sufficiently that it cooks evenly; and it washes off some of the surface starch that causes the rice grains to stick together
2. Water =1.5X the volume of rice you use
3. Use a pot that isn't too big! for up to 2C of rice, I use this 3 quart heavy-bottomed saucepan
4. Bring the water and soaked rice to a rapid boil and quickly lower the heat to the lowest setting on your stovetop
5. put a tea towel (or paper towel) between the lid and the pot. This helps keep ALL the steam inside the pot, which makes for a nice fluffy texture
on my stove, I cook for 12 mins, turn the heat off and let stand another 10
This post has been reshared 4 times on Google+
View this post on Google+
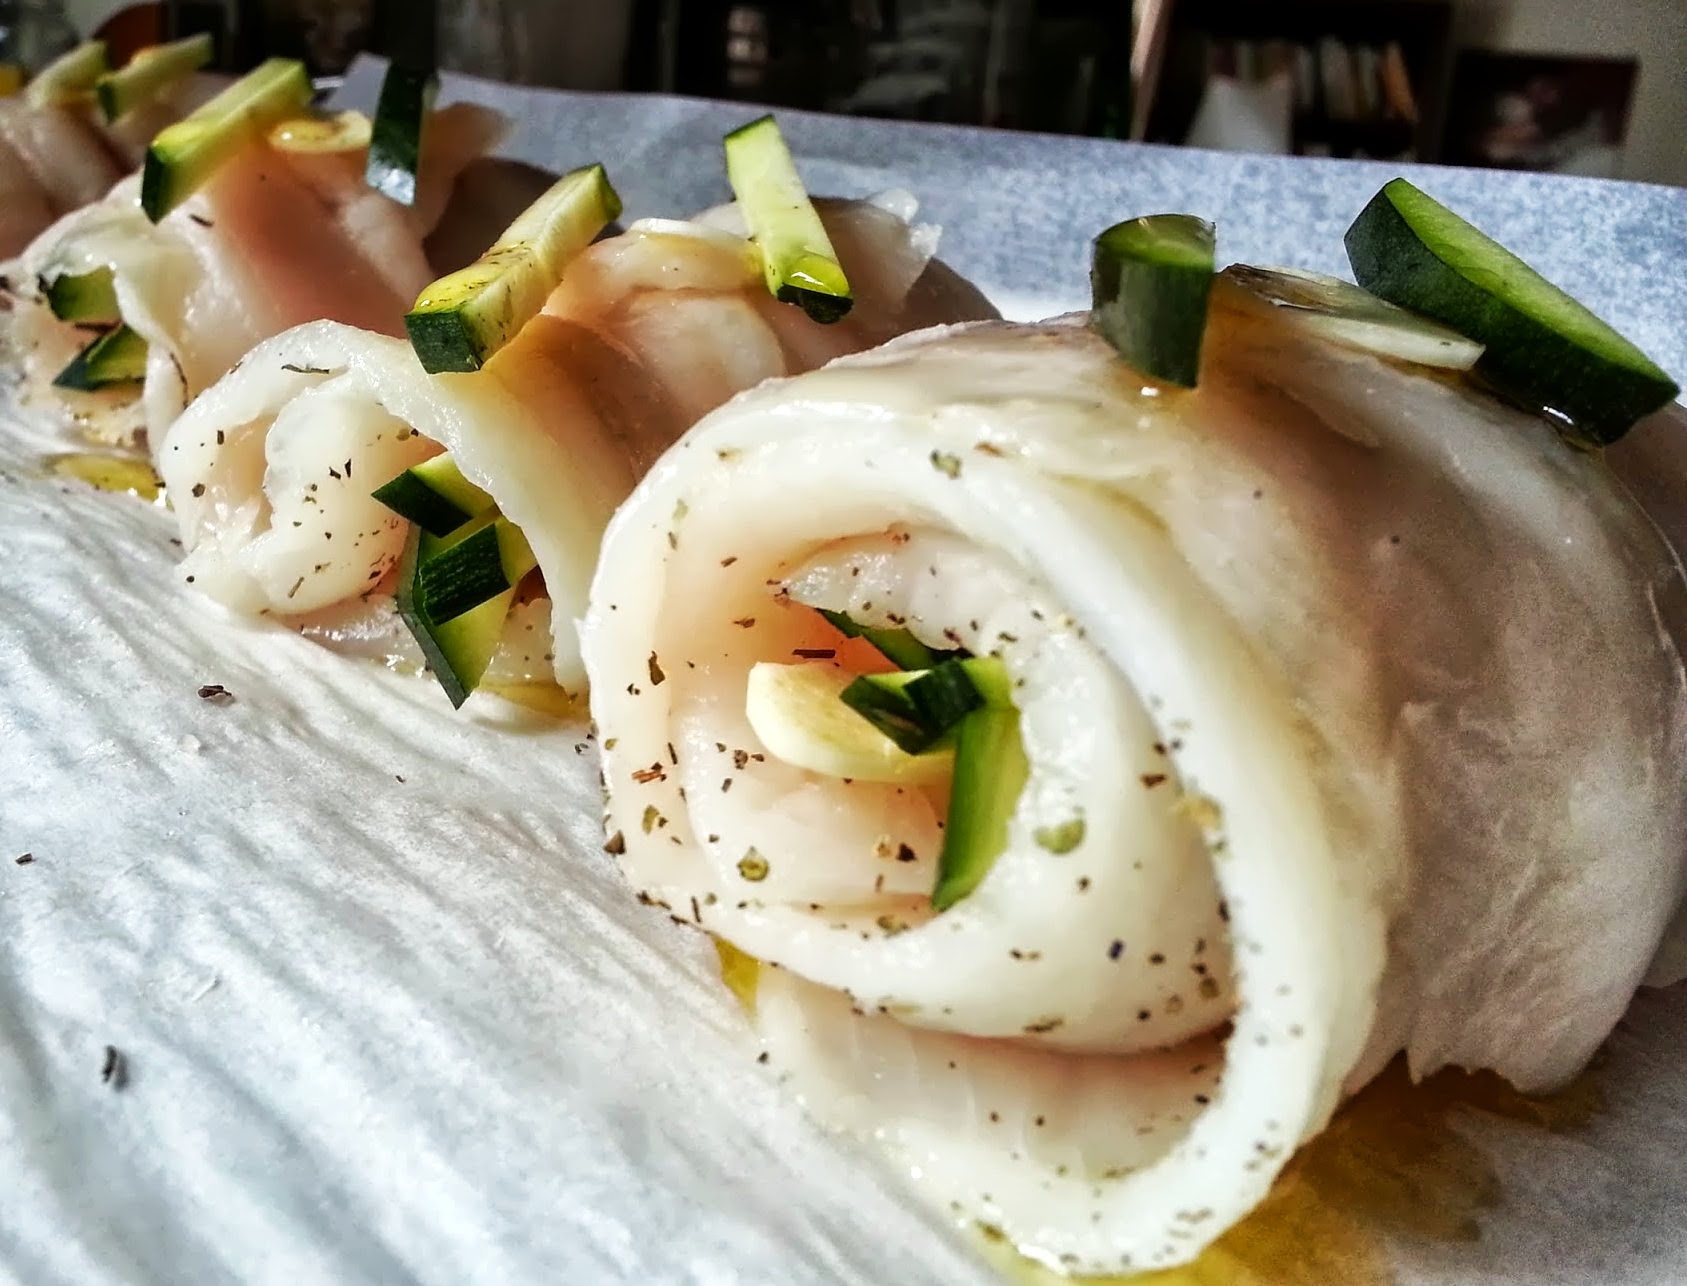 If you are looking for a fast dinner option that is relatively inexpensive, and can be gussied up any number of ways, look no further than sole! Here on the West Coast of BC, its fished year-round, making it a local, fresh (not frozen) fish option.
It comes in flat fillets that are really easy to roll up with all kinds of fillings, and once prepared, it takes only about 10 minutes to cook in the oven at 375 – 400 degrees. You can do double-duty in the oven, and roast some vegetables such as carrots or zucchini with onions, garlic, olive oil and seasoning, and then use the cooked vegetables as filling! OR, you can make a spinach-ricotta filling, OR caramelized onion and peppers … the possibilities are limited only by your imagination. Because the sole is such a mild flavoured fish, it serves as a backdrop for all kinds of flavours.
Just remember when you lay out your fish fillets, lay them with the spine-side up (its easy to spot, as its much smoother than the outer side) – you won’t need any toothpicks as the proteins in the fish contract more along the spine side, making the roll even tighter once it cooks! Self Sealing! Bake on parchment at 400F for 10-13 minutes.
You can see these ones were rolled up with zucchini and garlic slivers, seasoned with salt, pepper and a dusting of Herbs de Provence, drizzled with olive oil.
Let me know in the comments below what fillings you like to pair with your sole fillets! I’m also thinking about doing a video demo on how to roll these up – link will be posted here if I do.
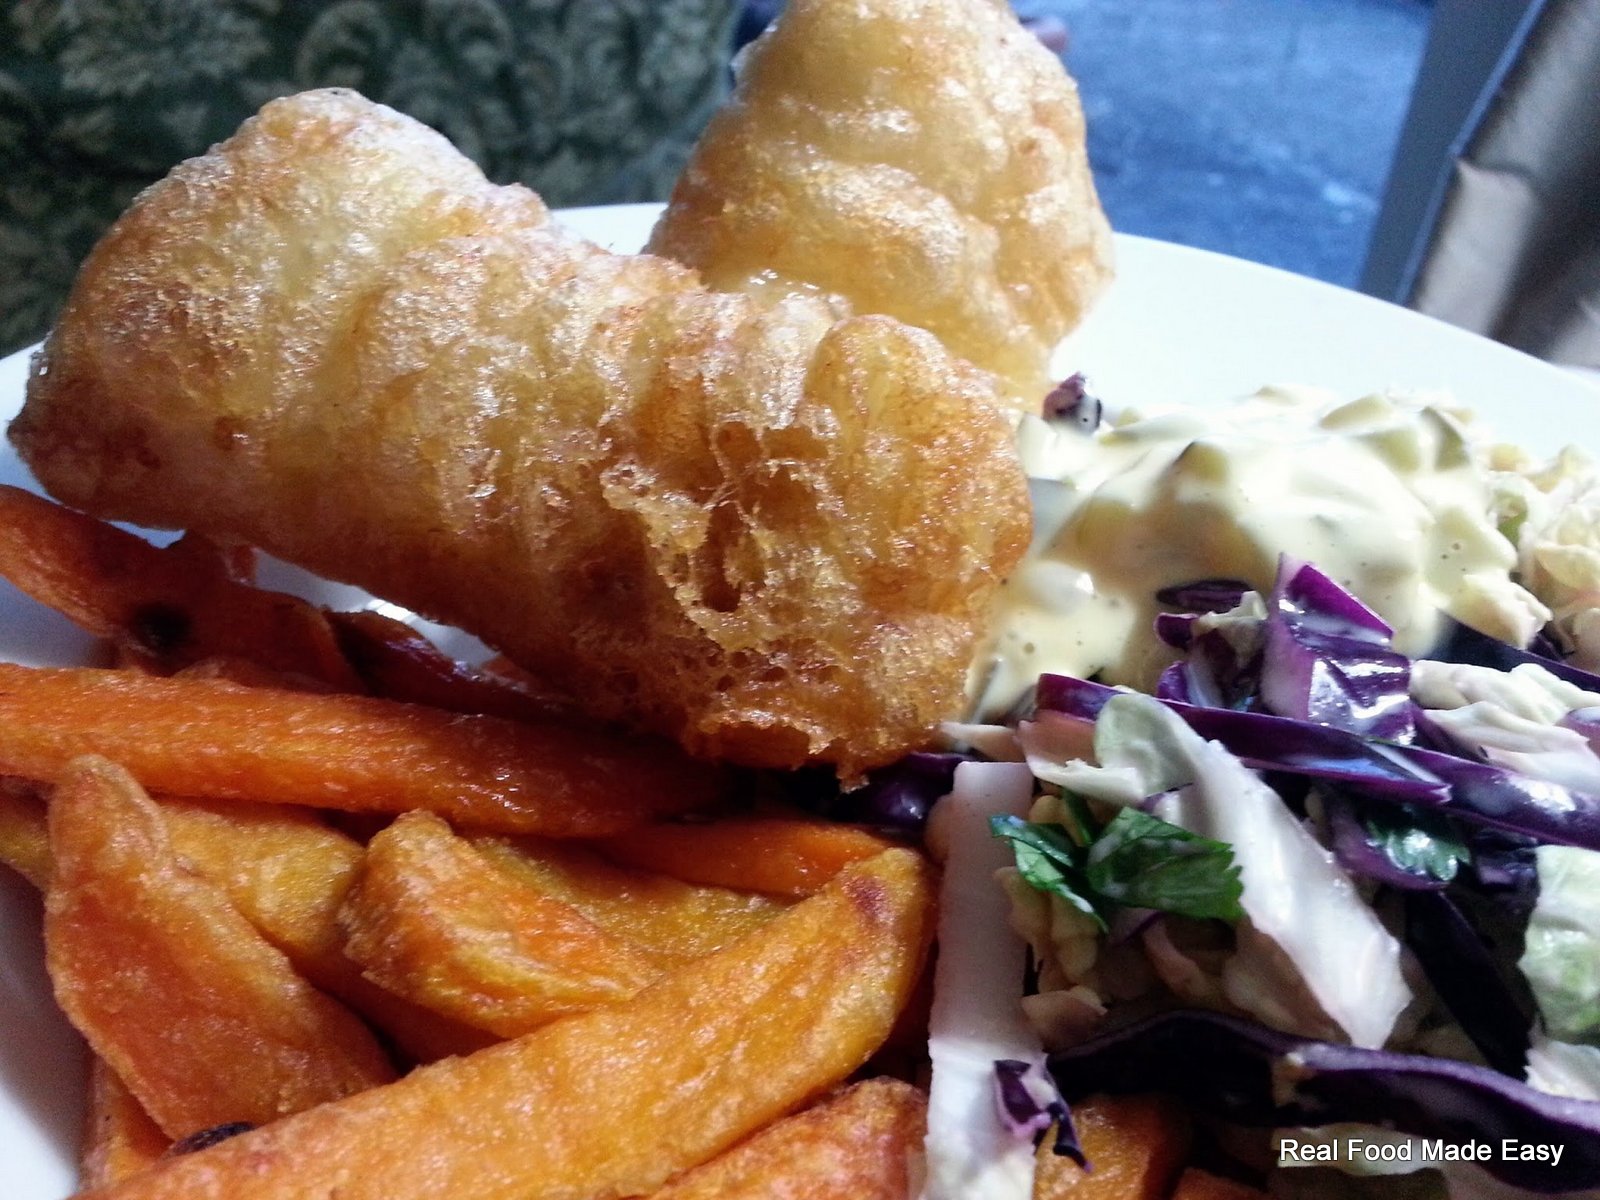 yes, Virginia, I said gluten-free fish n chips!
This all began with a sampling of gluten-free beers from our local liquor store, and a post from Jon Madsen over on Google+. Jon is an amazing home cook, turning out made-from-scratch versions of literally everything he and his family eat for breakfast, lunch and dinner (and I mean literally everything!). This particular evening, he had made some beer battered fish n chips which got Jeff musing about how he would like some fish ‘n chips!
I set about coming up with something similar, but gluten-free. There are lots of GF batter recipes out there, but all of the traditional British style recipes call for eggs. Because I’m stubborn! and because I don’t think old school beer batter should have eggs in it, I set about combining a few flours with some gluten-free beer.
Turns out, using the gluten-free flours produces an exceptionally crispy yeasted batter! I’ve used my bread flour blend to give this a bit of body, but added cornstarch and sweet rice flour for some lightness and crispness. We’ve tried a couple of different gluten-free beers for this – my preference of the brands we can get locally, is the Green’s Dubel Dark Ale, but Bard’s made a very nice batter too!
When you are frying these up, keep a couple of things in mind:
- make sure your oil is sufficiently hot – 350 F is ideal, and if you are frying multiple pieces of fish, you may need to increase the heat slightly.

- Drop part of the fish in the hot batter and swish back and forth gently to get the batter cooking and bubbling before dropping all the way in the oil (always away from you!)
- Don’t cut your fish into huge pieces or they take forever to cook! 4 ounces (or approx 120 grams) is a good size
- Drain your cooked pieces of fish on multiple layers of paper towel or newspaper, and keep warm in the oven while the remaining pieces finish cooking.
- You can use leftover batter for onion rings

Ingredients
- 75 grams Real Food Made Easy bread flour blend (or other gluten-free AP flour blend without gums)
- 40 grams sweet rice flour
- 35 grams cornstarch
- 3/4 tsp xantham gum
- 3/8 tsp Old Bay Seasoning (optional)
- 1/2 tsp salt
- 1 1/2 tsp instant yeast
- 200 ml gluten free beer
- 200 ml water
- (Real Food Made Easy bread flour blend: 1 cup sorghum flour; 1 cup garfava flour; 1/2 cup brown rice flour; 1/2 cup potato flour; 3 cups tapioca starch; 3 cups potato starch)
Instructions
- Combine all the dry ingredients in a medium bowl, and whisk well to combine.
- Add the beer and water to the bowl, whisking to combine everything into a batter.
- Let stand, covered for 45-60 minutes before dipping fish pieces into the batter and frying in hot oil.
 its cookalong time, and this month over on Google+, Shinae Robinson organized an African Food Cookalong.
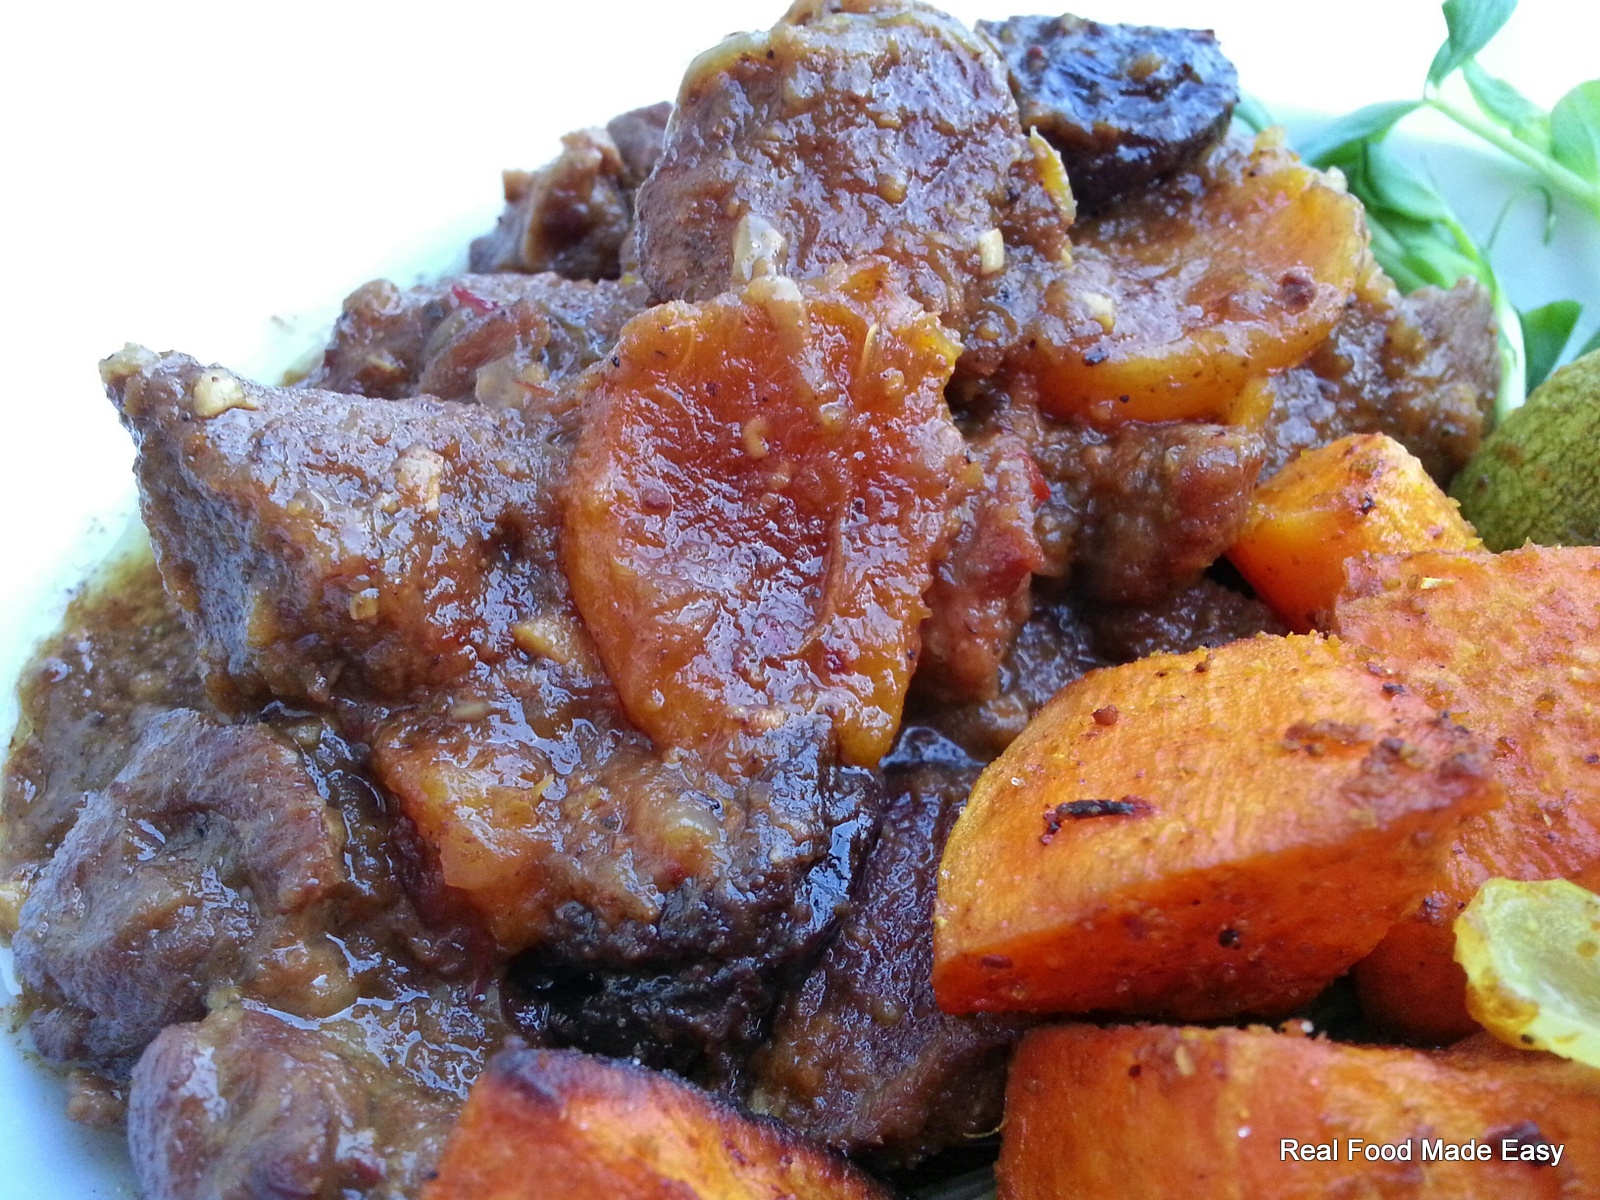
These cookalongs run for the week (Sunday-Saturday), and are a great way to try cooking something a little different than your usual fare, and check in and see how others are going about it! This month’s endeavour was African food, and because Jeffrey has developed a sensitivity to peanuts, I decided not to make the groundnut stew, but do a tagine and roasted vegetables. There was a chicken and a vegetable tagine recipe for the cookalong, but wouldn’t you know it, when I stopped in the supermarket the day before, there was a lovely lamb shoulder roast that had been drastically marked down!!! Clearly, we were meant to be eating lamb tagine ;).
Tagines are traditionally slow cooked in an earthenware covered dish with a conical lid that keeps the juices in the braise circulating, BUT because it is really nothing more than a braise, you can produce great results in a dutch oven, or even a pressure cooker. The trick is to make sure your pot keeps the delicious juices inside. We did ours in the pressure cooker for about 45 minutes to break down the tougher pieces in the lamb shoulder. This would take about 2 1/2 hours in a 275 degree oven.
The method for this is pretty straightforward, and the same method you would use for any stew. You can see the ingredients for the tagine are actually fairly simple – this is about taking the time to develop the flavours at every stage of the braise.
- Cut and season your protein (lamb in this case).
- Take the time to brown the meat – don’t crowd the pan otherwise it will boil, not brown (yuk!)
- Reduce heat and add the onions (and other aromatics if you are using them). Cook until the onions are soft and have some colour on them.
- Add spices if you are using them (wait to add herbs). This lets them toast a little bit, drawing out maximum flavour
- Add your meat back, along with any juices.
- Add your liquid, making sure to scrape any fond (brown bits) into the liquid.
- Add your vegetables
- Cook low and slow until the meat is tender. if you are using an inexpensive cut with a lot of connective tissue, this will take a while! Kick back with a cocktail or a glass of wine while its burbling away.
- Finish with a thickener if you are using one, and give your stew a final seasoning if needed.
Ingredients
- 1 tsp aniseed
- 1 tsp fennel seeds
- 1 tsp whole allspice berries
- 10 whole green cardamom pods
- 1 black cardamom pod
- 1/2 tsp whole cloves
- 1 tsp whole white peppercorns
- 1 whole cinnamon stick (if you can find true cinnamon, use this!)
- 2 tsp whole coriander seeds
- 1 tsp whole cumin seeds
- 1 tablespoon ground ginger
- 2 blades dried mace
- 1 Tablespoon fenugreek seeds
- 1/2 tsp dried lavender flowers OR 1 large dried rosebud
- 1 bayleaf (remove the rib before adding to your spice grinder)
Instructions
- Place all ingredients in a spice blender and blend until the spices are pulverized and a uniform texture. Pass through a fine mesh sieve and store in an airtight jar.
Ingredients
- 2-3 lbs lamb shoulder
- salt to taste
- 2-3 T olive oil
- 2 medium onions (about 3 cups sliced pole-pole)
- 3-4 cloves garlic, minced
- 2 T Ras el Hanout
- 1 cinnamon stick
- 1 large bay leaf
- 1/2 tsp saffron
- 1 1/2 cup water
- 1/2 cup dried apricots (about 12-13)
- 1/2 cup dried prunes
Instructions
- cut the lamb shoulder into cubes (approx 3/4"- 1")
- season the lamb pieces with salt and pepper
- Heat the olive oil in the bottom of a Dutch oven or pressure cooker - medium-high heat.
- Brown the meat on all sides. You will probably have to do this in 2 batches. After the meat is browned, empty the pot, add 1 T more oil if necessary, and lower the heat to medium.
- Add the onions and a pinch of salt, and cook, stirring occasionally until the onions are softened and beginning to brown.
- Add the garlic, and the Ras el Hanout, and cook for another 1-2 minutes until you can smell the spices beginning to toast.
- Add the meat back to the pot, along with the cinnamon stick, bay leaf, saffron and water, stirring well to pick up any browned bits off the bottom of the pot. Add the apricots, and cover the pot.
- If using a pressure cooker, bring up to pressure and cook for 35 minutes. If using the oven, put the Dutch oven in a preheated 275 degree oven and cook for 2 hours, covered (also check to see if more water is required)
- After the initial cook, open the pot and give everything a stir, and add the prunes to the top of the pot. Put the lid back on a cook for another 10 minutes in the pressure cooker or another 30 minutes in the oven.
- Check for doneness, adjust seasoning if needed, and finish, stirring on the heat for 3-4 minutes.
- Serve over couscous, or for a gluten-free option, serve over rice or whole sorghum, with roasted vegetables on the side. Garnish with toasted chopped almonds and sliced green onions
Ingredients
- 1 large yam, peeled and diced
- 1 Zucchini, diced
- 2 large carrots, diced
- 2 small onions, each cut into 8 wedges
- 3 garlic cloves, sliced
- 1/2 lemon, cut into 1/4" dice, peel and all
- salt
- pepper
- 2 T olive oil
- 2 T balsamic vinegar
- 1 tsp Ras el Hanout
- 1 tsp ground cumin
- 1 tsp ground coriander
- 1/2 tsp ground tumeric
Instructions
- Preheat oven to 400 degrees
- Place all vegetables in a large bowl with the spices, salt, olive oil and vinegar.
- Toss to thoroughly combine everything and evenly coat the vegetables
- Place on a parchment-lined baking sheet
- Bake for 40-45 minutes. Stir once while the vegetables are roasting.
there’s still a few days left in the cookalong! if you give it a try, make sure to post pictures on the event page and/or tag it with #sfpcookalong13!
]]>

2-3 cups fresh pineapple
150 g butter
150 g brown sugar
Cake:
85 g unsalted butter (very soft)
60 g brown sugar
40 g granulated sugar
80 g yogurt
85 g egg
splash vanilla extract
100 g bette hagmans featherweight blend
1/4 tsp baking soda
1/4 tsp baking powder
1/4 tsp salt
1/2 tsp xantham gum
9″ round yields a thin cake layer, 8″ round a taller cake layer. bake 350 for 35-45 mins.
featherweight blend:
1 c superfine rice flour (brown and white work equally well IMO)
1 c tapioca starch
1 c cornstarch
1 T potato flour
This post has been reshared 5 times on Google+
View this post on Google+