And so, (not surprisingly, just like with “gluten-full” foods) the best way to get great tasting gluten-free baking, with great texture, is to make it yourself. Unfortunately many people feel intimidated by the prospect of baking, regardless of whether it is wheat flour baking or gluten-free. Yes, baking can be daunting if you haven’t done much of it before getting a diagnosis, and yes, gluten-free baking IS more finicky and exacting than baking with wheat flour, so the fallback for an inexperienced baker is to purchase pre-baked and pre-packaged items rather than making a large purchase of a flour blend that may or may not result in a great baked good.
The fact is that coming up with a good blend can be complicated – allow me to get somewhat technical here. Gluten in wheat flour performs several functions in baking, ranging from its water absorbing/gel creation properties as a hydrocolloid to the stickiness created by Gliadin, or the stretch and strength created by Glutenin. When moistened and heated, these proteins help leaven your baking, but they also gelatinize at high temperatures helping create structure in your baking (so your breads and muffins don’t collapse). To further complicate things, the functions gluten performs that are most important in breads (stretch and leavening) are different than the functions most important for great cookies or pies. So you can see that creating a duplicate gluten-free blend requires a bit of reverse engineering that unfortunately no single flour alone can replicate. The fact is, most home kitchens do not have the luxury of the space required to store a large number of flours to create different combos on-the-fly, let alone use them all up in a timely manner, therefore an all-purpose blend provides a happy medium kind of alternative.
When it comes to provisioning up your gluten-free pantry, you have no doubt seen that gluten-free blends across the board are MUCH more expensive than wheat flour. By way of comparison, I can go to one of the best (wheat) bakeries in the city, and buy freshly stone-milled, sifted red-fife wheat flour direct from the baker for $5 per kilogram – and that is a premium product. Regular old all-purpose flour runs around $1-1.50 per kilogram depending on the brand. Most of the gluten-free flour blends I’ll be testing out average $10-15 per kilogram, and unlike wheat flour, have HUGE variability in terms of the their ingredients, flour grind size of one or more of their component flours and utility for multiple purposes – meaning frustration, time, energy and potentially wasted product for the average home baker before finding a blend that works for them.
And so, I thought it was high time I did a bit of a roundup of some of these flour blends so you don’t have to.
The Plan
The plan is to bake a number of items with a number of readily available gluten-free flour blends and have some discerning tasters give me their 2c worth.
I plan to make a number of things that the average home baker would be likely to bake: cookies, muffins, pie, cake, sandwich bread and possibly pasta or Asian dumplings. I will use recipes that I’ve created that I know are tried and true, and just for shits & giggles, we’ll include that as the “control” in each case. I’ll also provide an approximate cost for the flour used for each recipe so readers will have a benchmark to compare against purchasing flours individually and blending themselves.
Tasters will be trying these out blind, so they won’t know which one contains which flour. This will be a series of posts, so in the interests of keeping this manageable, I’ll do cookies one week, muffins the following week etc.
Tasters will be asked to score each recipe on: taste, appearance, texture and overall impression (20 points total) and I’ll publish the unvarnished results, whatever they may be.
A few disclaimers to start:
- I do NOT use a master flour blend for most of my baking or even for each family of items, but rather use a different combination of flours in each recipe. I bake by weight, so all flour substitutions will be done by weight rather than volume. If the flour blend contains gums, I will eliminate from the recipe and rely solely on the binders in each flour blend.
- I am not being compensated for this by any manufacturer or organization. All flours have been purchased at retail prices by myself. Any opinions expressed will be mine or those of the tasters.
- Tasters will be a combination of people who eat gluten-free and those who don’t.
- There are NO affiliate links in this blog post.
A rantword about pricing and “gluten-free”
Many of you will be aware that the term “gluten-free” has been defined under regulation in Canada since 2012 by Health Canada, and is enforced for all packaged food products by the Canadian Food Inspection Agency. Under this regulation, any food making a claim of “gluten-free” on its label MUST not only disclose any ingredients that may contain gluten (wheat, barley, rye etc…) but must also be prepared to prove by testing that the gluten content falls < 20 parts per million. If the producer is not testing for gluten content, then any possible cross contamination MUST be noted on the label. Wheat-free oats have been excluded from the gluten-free definition until now, but that is a whole other blog post.
The labelling and testing of products to maintain this standard is not insignificant, and adds to the cost of the final product. If you are a label-reader, you will not doubt have picked up packages of things like spices or rice, or beans that contain this “may contain … “ or “packaged in a facility…” disclaimers. Statements such as these are being made in order to be in compliance with the Health Canada Regulation without incurring the additional expense of sending products out for testing – EVEN IF THE PRODUCT IS INHERENTLY FREE OF GLUTEN. Think of it as a CYA statement.
So why am I going on at length about this? in part to give readers some sense of the factors that go into the pricing for a final retail product, but also to flag the fact that the same concerns apply at ALL stages of the supply chain! This means a manufacturer of gluten-free flours must
- do their R&D to create a blend that works – which means formulating and testing — a LOT of testing and then
- source ingredients at a wholesale level and test-bake with them because not all gluten-free flours are created equal (e.g. compare these grinds just in brown rice flour https://plus.google.com/+JaniceMansfield/posts/iPC3sBPNafn – a manufacturer will need to do that for every component of their blend!)
- source ingredients that are in fact, certified gluten-free and will be available on an ongoing basis. The gluten-free landscape is a rapidly shifting one, as people jump in with both feet, hoping to capitalize on this market, and then fade out just as quickly as they discover the costs and level of effort to do this in compliance with the Health Canada regulations are higher than they thought, or that the Celiac community is far less willing to purchase mediocre products than they presumed.
So at the end of the day, all of this contributes to the final product price – and in fact, with many prepackaged blends the customer is paying twice for the costs associated with gluten-free certification – once at the wholesale procurement stage, and again at the final product packaging stage. (A manufacturer could go to great effort to procure gluten-free flours, but then produce an unsafe product because they were mixing it in a facility with cross contamination present – so testing at both stages remains important!)
Note that this only applies at present to packaged goods, not to goods produced in a bakery or cafe and sold directly to customers. There are currently many bakers making claims of “gluten-free” baking in spaces that produce predominantly wheat baking. It is important, as consumers to continue to ask questions in cases where you may be unsure. How is cross contamination managed? Where are gluten-free products stored? and are there different leavenings, spiced, nuts etc sourced and used in the production of their gluten-free products? Do they use separate baking pans and equipment when baking gluten-free cakes and muffins? … are just some of the concerns. Again – all of these add to the cost of doing gluten-free in a conscientious way where you are making a product for direct sale.
The flours
For each flour tested, there will be a summary table, plus at the end, a list of some other available flour blends that didn’t make it into this round, but may be used for future rounds of testing. I’m working with a list of products readily available in Canada – there are a few that I would love to have on the list but they either don’t ship here at present, or the cost of shipping is prohibitive.
Cup 4 Cup
This is one of the most widely recognizable brands out there. It was originally created by Lena Kwak when working as head pastry chef for Thomas Keller at French Laundry in response to customers asking for gluten-free options. It claims to have premium taste and texture, “just like wheat flour” and also claims to be suitable for 1:1 volume substitutions in all your favourite wheat-flour recipes
| Contains dairy? | yes |
| Contains gums? | yes |
| Cost per kilogram (approx) | $15.40 |
| Weight per cup (g) | 128 g |
| Calories per cup | 480 |
| Carbohydrates per cup (g) | 104 |
| Ingredients: cornstarch, white rice flour, brown rice flour, rBST-free milk powder, tapioca flour, potato starch, xanthan gum | |
Bob’s Red Mill 1 to 1 Baking Flour
http://www.bobsredmill.com/gluten-free-1-to-1-baking-flour.html
Bob’s Red Mill is one of the original companies that began taking gluten-free seriously. They are located in Oregon, originally stone grinding wheat and other wholesome grains. As demand for gluten-free products increased, they created a dedicated facility for grinding and packaging gluten-free flours, ranging from brown rice to teff, quinoa etc. Many years ago, they created one of the first “all-purpose” blends (gum-free) on the market, which has some ardent fans, and others who feel it is heavy on the legume flours. They introduced this cup for cup flour blend last year, in response to customer requests for something they could use to convert their wheat flour recipes.
As a nice bonus, Bob’s Red Mill has been employee owned since 2010 when owner Bob Moore transferred all his stock to the employees, so your purchases have a very direct benefit for the people making the product!
| Contains dairy? | no |
| Contains gums? | yes |
| Cost per kilogram (approx) | $11.00 |
| Weight per cup (g) | 148 g |
| Calories per cup | 520 |
| Carbohydrates per cup (g) | 120 g |
| Ingredients: sweet rice flour, whole grain brown rice flour, potato starch, whole grain sweet white sorghum flour, tapioca flour, xanthan gum | |
Cloud 9 Gluten-free All Purpose Baking Mix
http://www.cloud9specialtybakery.com/secret-ingredient.html
Cloud 9 is a gluten-free bakery located in New Westminster, BC, that created a gluten-free blend for their own use in the bakery. As demand for gluten-free grew, they began making their flour blend available and began making them available in larger formats. They have fairly wide distribution at the moment, in locations such as Costco, and Save On Foods.
| Contains dairy? | no |
| Contains gums? | yes |
| Cost per kilogram (approx) | $10.50 |
| Weight per cup (g) | 152 g |
| Calories per cup | 520 |
| Carbohydrates per cup (g) | 116 g |
| Ingredients: rice flour, buckwheat flour, cornstarch, potato starch, tapioca starch, xanthan gum | |
Namaste’s Perfect Flour Blend
http://www.namastefoods.com/products/cgi-bin/products.cgi?Function=show&Category_Id=4&Id=13
Namaste Foods is a smallish company based in Idaho, that was started in 2000 specifically to create a gluten-free mixes that were also free of the major allergens such as soy, corn, dairy and nuts. They business growth model was very much a grassroots one – with limited resources for marketing, they chose to spend time cultivating relationships with organziations such as Celiac support groups, and allergy awareness groups. Now, as a larger company 11 years later, they give back a portion of their proceeds as charitable donations to support groups.
Namaste’s Perfect Flour Blend claims to be a cup for cup substitute in any of your favourite wheat flour recipes.
| Contains dairy? | no |
| Contains gums? | yes |
| Cost per kilogram (approx) | $14.00 |
| Weight per cup (g) | 138 g |
| Calories per cup | 480 |
| Carbohydrates per cup (g) | 111 g |
| Ingredients: sweet brown rice flour, tapioca starch, brown rice flour, arrowroot powder, sorghum flour, xanthan gum | |
Cusine Soleil All-Purpose Mix
http://www.cuisinesoleil.com/en/produits/
Cuisine Soleil was founded in 2005, to create gluten-free, organic ingredients, so customers could make healthy gluten-free foods for themselves. The company founders have strong academic backgrounds in the agricultural and biological sciences, and crafted their products with agricultural sustainability in mind. Initially, they focussed on direct sales to customers at small farmers’ markets in the Abitibi area of Quebec. As they have expanded, they have been able to partner with production and distribution partners, making their products available across Canada.
Their all-purpose blend claims to be a versatile blend. Although it is implied, it does not explicitly say it is a cup for cup replacement mix, and is free of both cornstarch and potato starch. All of their flours are certified organic and non-GMO.
| Contains dairy? | no |
| Contains gums? | yes |
| Cost per kilogram (approx) | $12.00 |
| Weight per cup (g) | 148 g |
| Calories per cup | 520 |
| Carbohydrates per cup (g) | 120 g |
| Ingredients: brown rice flour, tapioca starch, chickpea flour, guar gum | |
Ideas in Food: Aki’s low allergy blend from Gluten-free Flour Power
Ideas in Food is the blog, book and culinary consulting business of Aki Kamozawa and Alexander Talbot. They are consummate experimenters, and began their blog as a means of capturing the results of their experimenting in their restaurant kitchen.
They published their most recent book, Gluten-free Flour Power in March 2015. They bring their understanding of the science of food to everything they do, and this book is no exception – it contains 3 master flour blend recipes, including this low-allergy blend. These blends have been formulated for the recipes in Gluten-free Flour Power, although they are also intended to be interchangeable in wheat-flour recipes
| Contains dairy? | no |
| Contains gums? | no |
| Cost per kilogram (approx) | $10.50 |
| Weight per cup (g) | 130 g |
| Ingredients: Tapioca starch, sweet rice flour, arrowroot powder, sorghum flour, Golden flax meal, potato flour | |
Other blends for future consideration
Robin Hood Nutri-flour Gluten-free blend – a somewhat lower priced option, this blend is made from rice flour, sugar beet fibre, tapioca starch and potato starch.
NextJen Gluten-free All Purpose Blend – Created by chef Jen Peters, in order to bake delicious things for herself after discovering she was gluten-intolerent. This flour is GMO-free, corn-free, preservative-free, dairy-free, and sulphite-free.
Sobey’s Compliments brand Gluten-free Baking blend
Pamela’s Artisinal Flour Blend – another flour blend intended as a 1:1 replacement in wheat-flour recipes
]]>
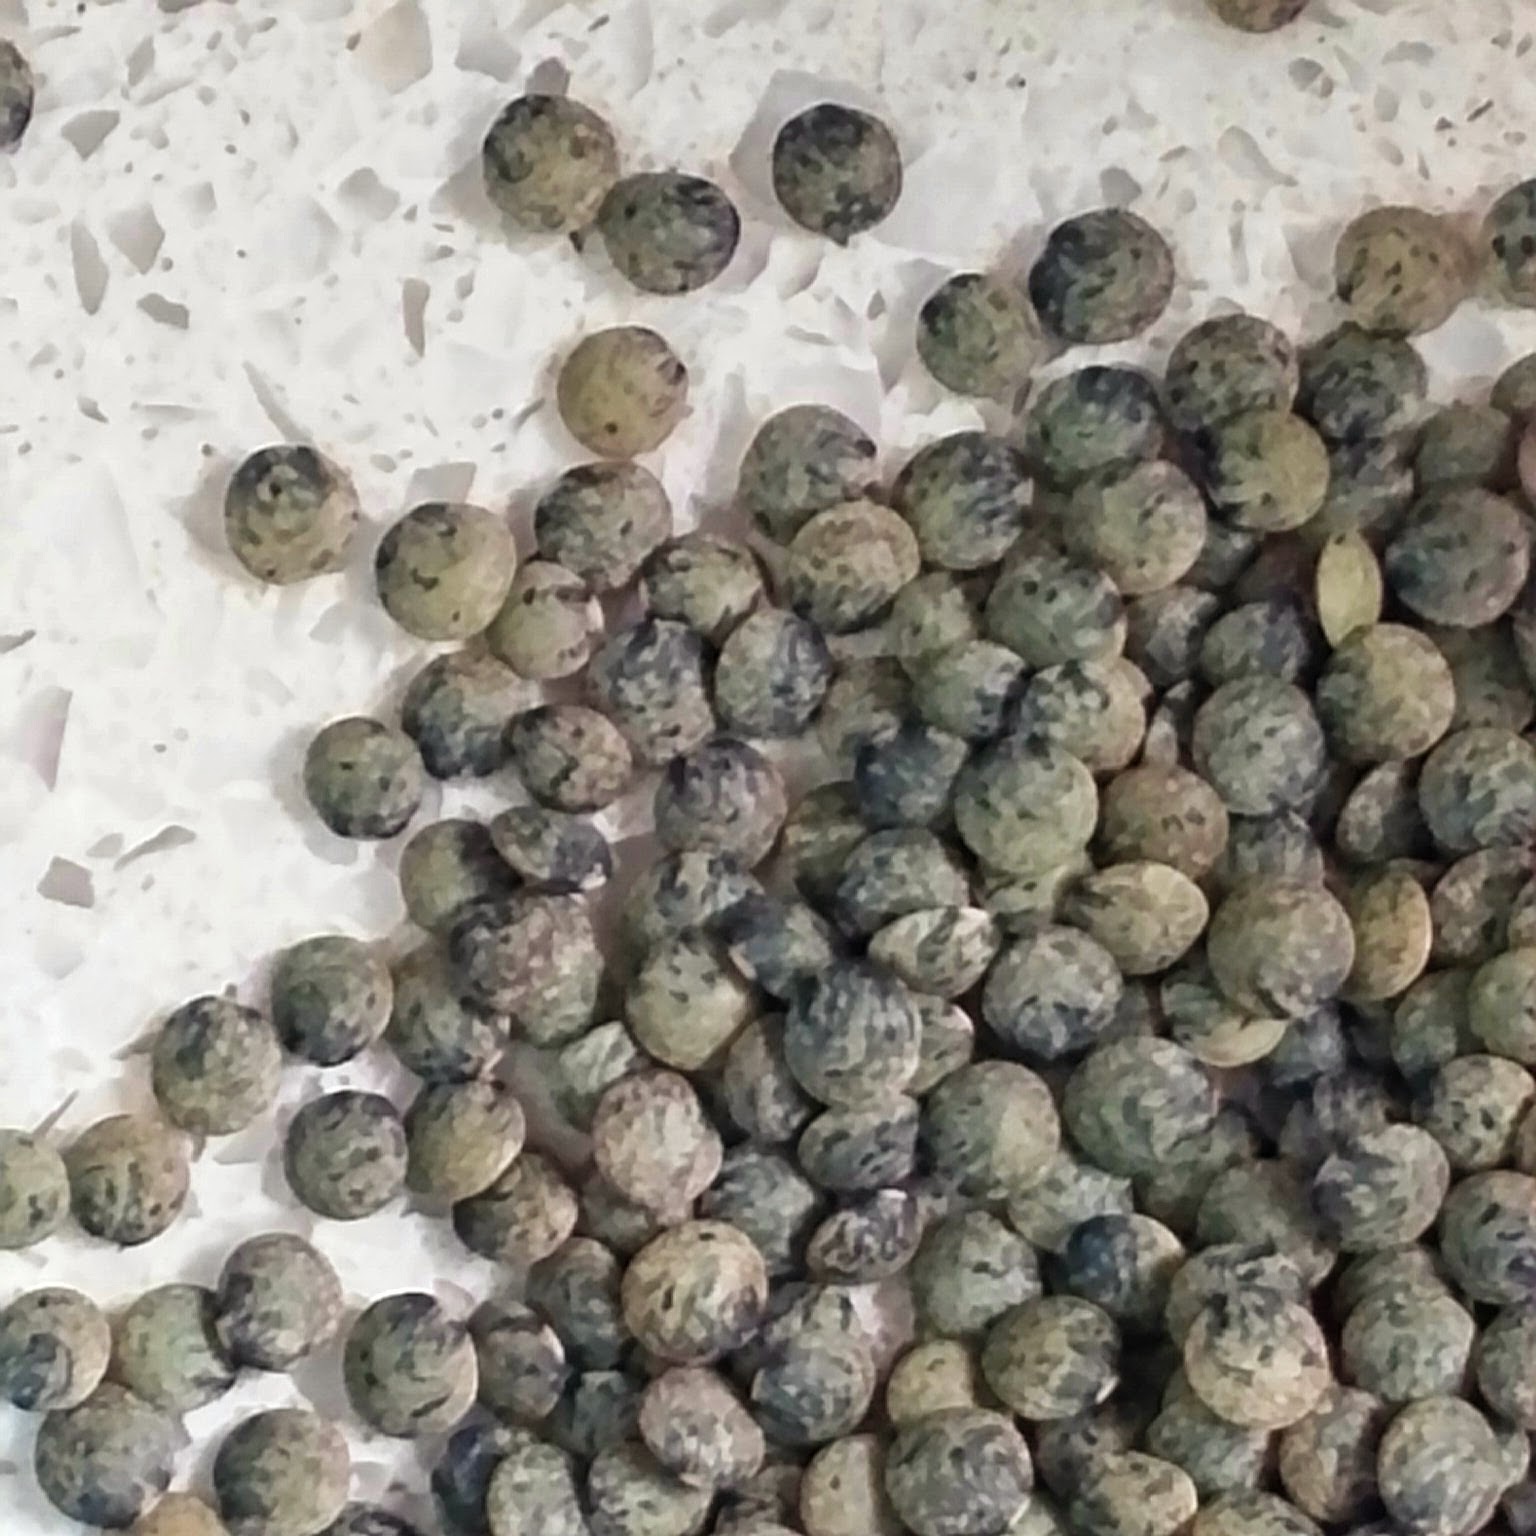
Lentilles du Puy
You may not automatically free-associate “lentils” and “Canada”, but in fact, Canada is the largest exporter of lentils worldwide, with most being grown in Saskatchewan. They are an easy growing crop, even growing well here on Vancouver Island, with our cool summer evenings (I’ve actually grown them in our own backyard garden!). If you haven’t had lentils harvested within less than a year, make a point of looking for them – both the taste and texture will take you by surprise at just how delicious something so simple can be!
Because lentils are high in protein and fiber, they work really well in baked goods when pureed – something most people find quite surprising, but they have just the right amount of starch and protein to hold things together while still giving a bit of spring.
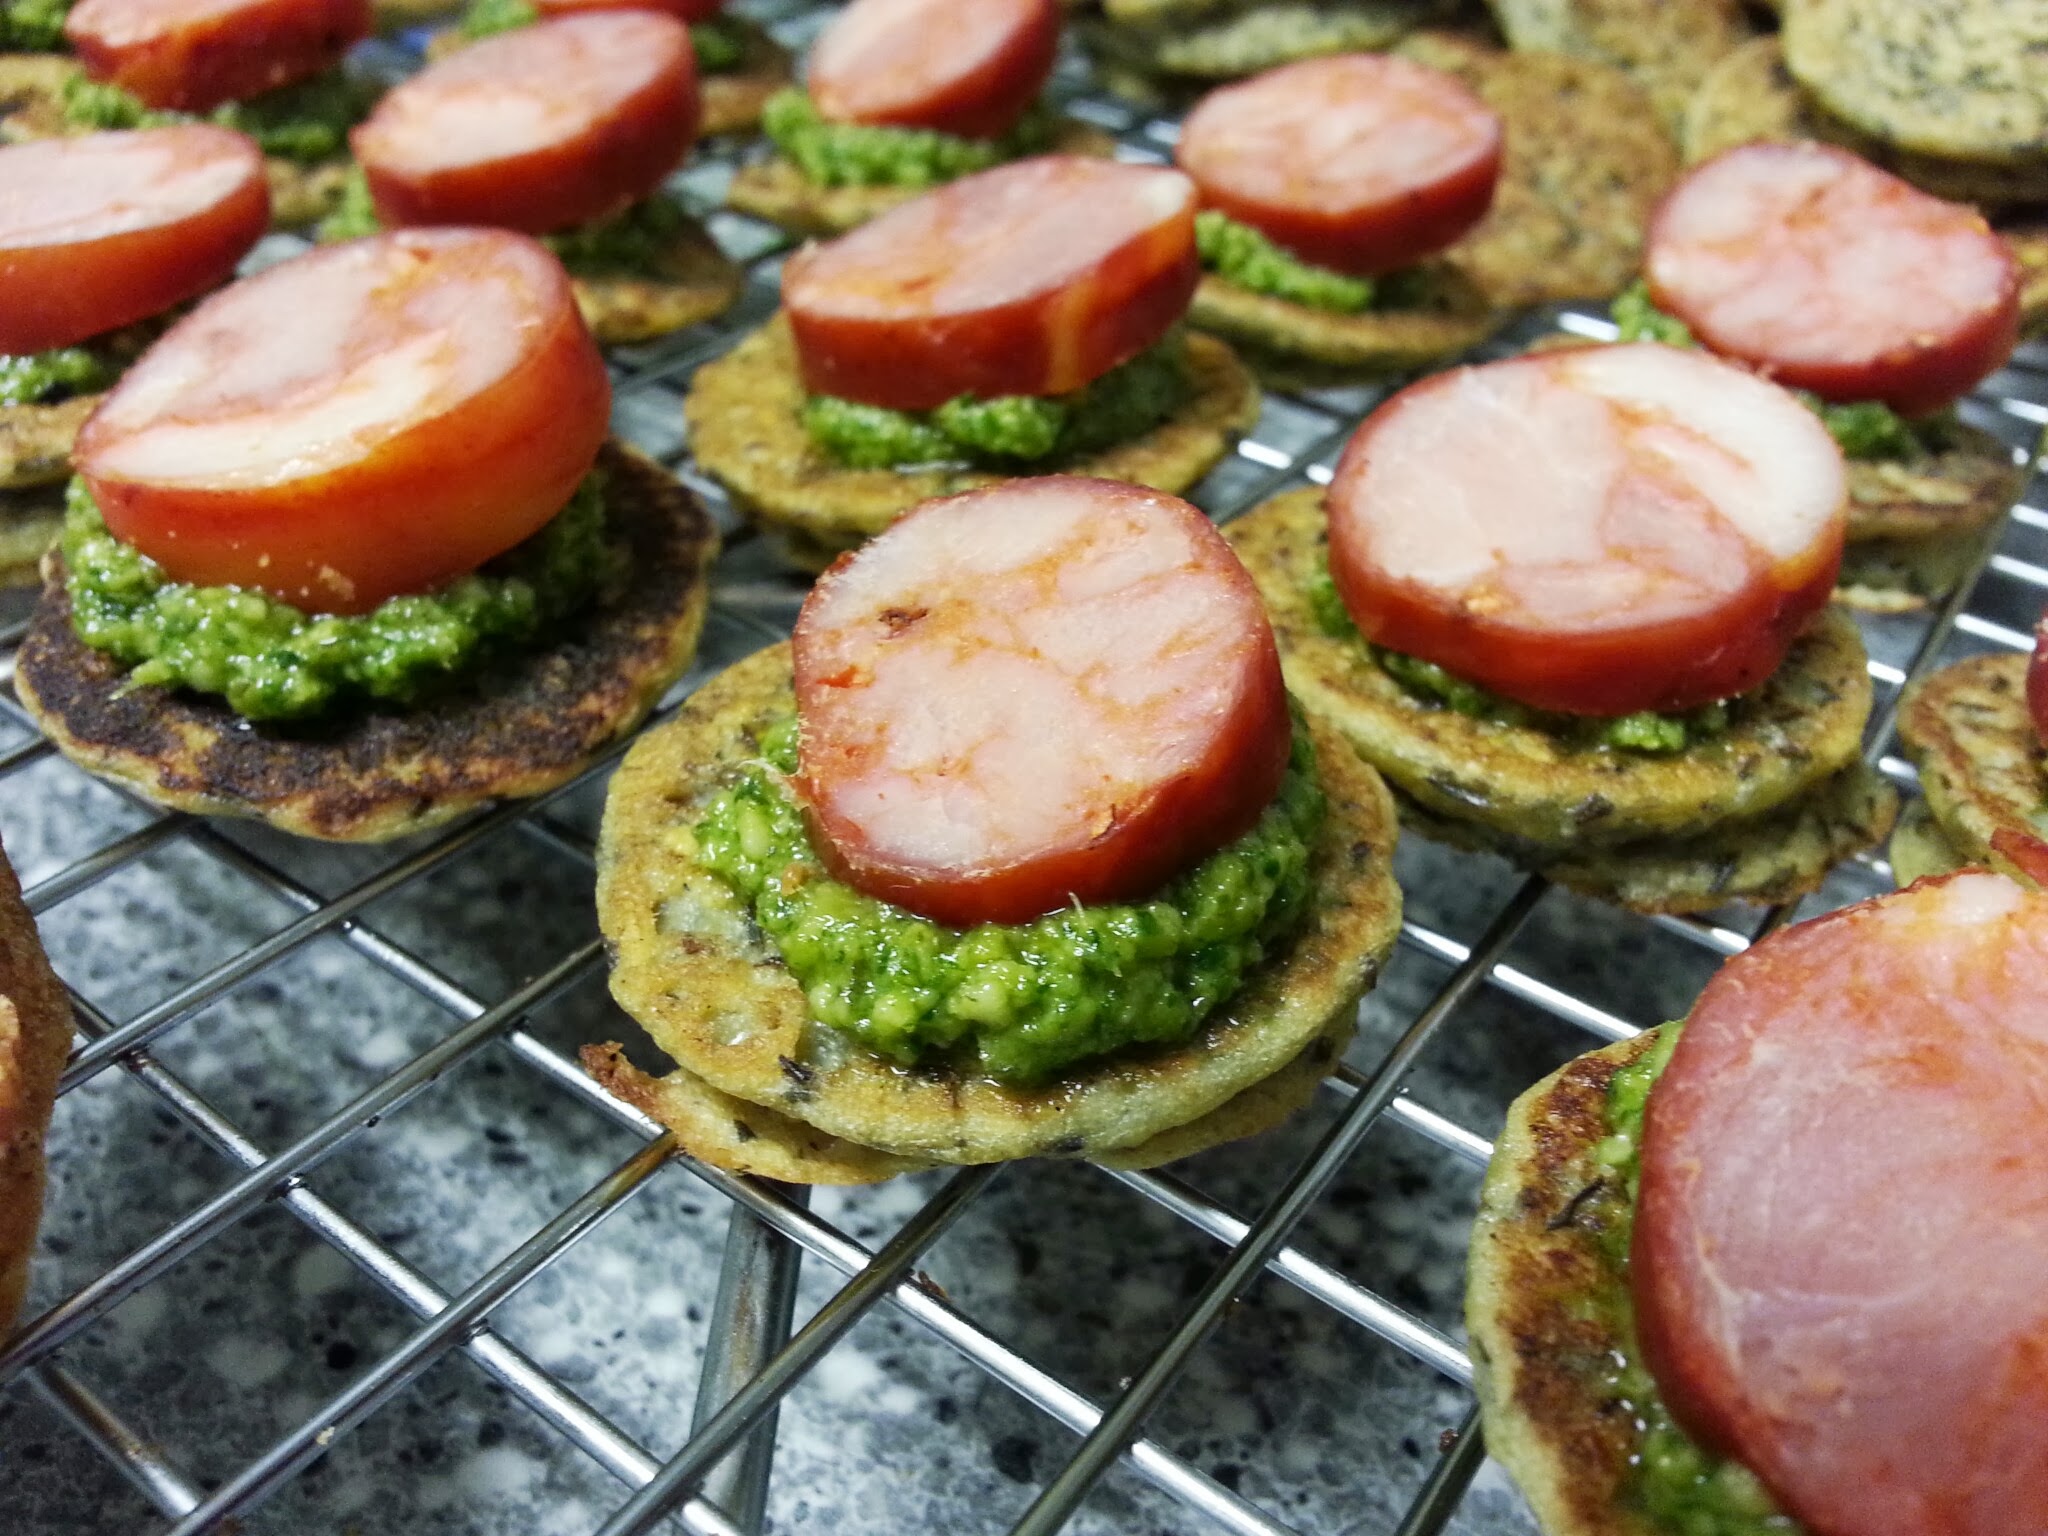
Lentil blini with Cilantro pesto and cured Chorizo
These little pancakes are easy to make, requiring no special equipment other than a blender, and because they use only lentils, don’t require any additional flours. They are dairy-free, gluten-free and grain-free, which means more of your guests with dietary restrictions can enjoy!
I first came up with these teeny blini as an appetizer when needing something grain-free to serve as a sturdy, but delicious base for canapes. Truth be told, this method of soaking legumes, and grinding them with a liquid, is an old one indeed! They’ve been using this method for centuries in India to create dosas with split peas and rice, and even get some natural bubble in them by allowing the mixture to ferment a little bit. I’ve made these a little richer, with with addition of coconut milk, and using eggs makes the process pretty foolproof. If you try these with an egg substitute, let me know how they turn out.

Lentil blini
Once you’ve made up your blini, what you top them with is limited only by your imagination. Pictured here, are some topped with whipped goat cheese and caramelized onion relish, and some topped with cilantro pesto and chorizo (try coconut “bacon” for a vegan option). They also make a great side instead of crackers with a cheese and charcuterie platter, and have enough flavour to stand up to that classic blini pairing of lox and capers, or creme fraiche and caviar if you’re feeling like something more luxurious.
- 1 cup Lentils du Puy (you can also use green lentils for these)
- 1 cup coconut milk (250 ml)
- 2 large eggs
- 1 tsp salt
- ½ tsp baking powder
- 1 tsp ground cumin (optional)
- 1 tsp ground coriander (optional)
- Soak 1 c Lentils de Puy in water overnight. They will double in volume.
- Put the soaked lentils in a blender with all the remaining ingredients.
- Blend for 1-2 minutes until the mixture is smooth. You may need to stop and scrape down the sides of the blender to thoroughly incorporate all the ingredients.
- Heat a frying pan over medium heat. brush the surface of the frying pan with oil, and pour the pancakes out in small twoonie sized pancakes.
- Cook 2-3 minutes until the edges set and the centres begin to bubble slightly, Flip and let cook another 2-3 minutes on the other side.
- Let the blini cool before topping.
]]>
And some cakes beg for a whipped cream frosting, like Black Forest Cake! But the real dairy-free whipped cream alternatives are limited, and sadly, don’t always carry their weight and become sadly droopy looking when you try and pipe them out.
And then I remembered Ermine Icing! A frosting borne of necessity in days of yore – it was the original crowning glory on Red Velvet Cake. The real deal Ermine frosting however, is wheat and milk based, where the gluten and casein help create a network that emulsifies the fat from butter beautifully.
It took a bit of tinkering about with a couple of flour bases, and a couple of different non-dairy alternatives, but I think this one is just as good as the original version (and its a pretty great standin for whipped cream if I do say!)
This frosting is something best made in a stand mixer, with the whisk attachment. In order to achieve an ethereally smooth yet light texture, the Earth Balance needs to cream together with the sugar for a good 5 minutes, and then beat with the “roux” another 5 minutes. You can achieve these results with a hand mixer, but you’ll be standing there a while.
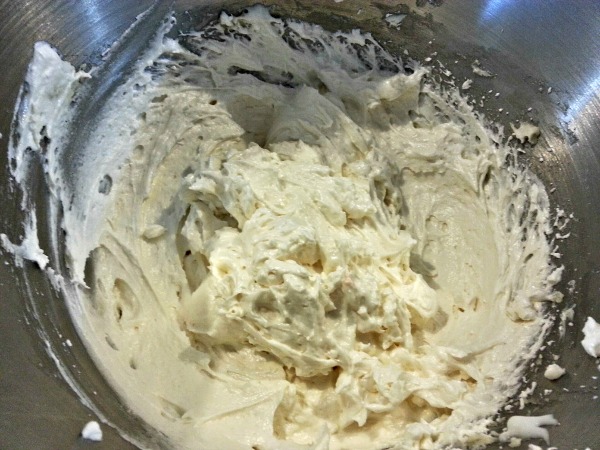
Ermine frosting – finished texture
- 250 ml coconut milk (full fat will give you the best texture)
- 60 grams sweet rice flour (I like Mochiko brand)
- pinch salt
- 1 tsp vanilla extract
- 2 sticks Earth balance buttery sticks shortening
- 200 grams (I cup) granulated sugar
- Whisk the coconut milk and sweet rice flour together in a small saucepan.
- Bring to a boil over medium heat, whisking continuously. The mixture will thicken as it comes to the boil. Cook until the mixture is thickened enough that you see whisk tracks.
- Remove from the heat, and whisk in the vanilla and salt. Cover with a piece of plastic wrap to prevent the top forming a skin, and let cool to room temperature.
- While the "roux" is cooling, beat the Earth Balance sticks with the granulated sugar at least 5 minutes until the mixture is light and fluffy.
- Add the cooled roux into the creamed butter and sugar and let it mix another 5 minutes. It should have the texture of thick whipped cream.
]]>
I am in love right now with buckwheat, and have been using a couple of different buckwheat flours, including one readily available at one of our supermarkets, milled by Cuisine de Soleil. It’s great for adding nutritional value to the flour blends I create for things like muffins, but also adds some binding and moisture-retaining properties to baked goods, and it adds a flavour dimension that the more typical starch-heavy pastry recipes lack. The final recipe uses a combination of buckwheat, sorghum, sweet rice and cornstarch for a great tasting and a reasonably well-behaved gluten-free pastry.
I’ve made this version with butter – a classic pate brisee, but you could just as easily substitute a solid vegan shortening such as Earth Balance in order to make it dairy-free. This is something that could be done in a food processor, but making by hand and taking the time to work the pastry by hand (fraisage) really creates a superior texture.
Technique
The technique here is exactly the same as you would employ with a wheat-based pastry. All of the dry ingredients are combined together and whisked well. Then the butter or shortening is cut into the mixture until it becomes crumbly with the largest pieces about the size of a pea. I use a metal pastry cutter to do this, and it takes about 3-5 minutes to achieve this texture. You could use a food processor, but you will end up with a finer mixture – those larger chunks of butter are THE thing that is going to make your pastry flakier.
Once you have cut the butter in with the pastry cutter, gradually add the liquid, cutting it in with a knife. It will still look like a crumbly mess, but will just hold together if you squeeze a handful together. Dump the whole mess out onto a clean, smooth countertop or large silpat mat. Here’s where its gets all fraisage-ey! You are going to heap the pile together gently with a bench scraper, and then with the heel of your hand, push down and away from you – you want to shear those pieces of butter into the pastry so they become thin sheets. Keep using the bench scraper to bring the pile together, and work the pastry in the same direction away from you until it starts to hold together in a ball.
Once you have the dough together in a ball, wrap it well in plastic wrap or in an airtight ziploc bag, and let it chill in the fridge for at least 1 hour, preferably overnight. This does a couple of things:
- it allows the flours to fully hydrate which will make your end product less crumbly. Gluten-free whole “grain” flours (the buckwheat and sorghum) absorb proportionally more moisture than refined wheat flour, and do so more slowly. In order to get a texture that is not crumbly and dry after baking, these flours need to be fully hydrated.
- a rest in the fridge allows the thin shears of butter to solidify again, meaning when the pastry is rolled out and baked, the butter layers can go from solid to liquid+steam much more quickly – it is that expansion of steam that makes for the flakiness.
- because the pastry can be made in advance (and frozen for 1-2 months even), it means you can prepare a lot of pastry ahead of time if you are so inclined, and have in in reserve. Just defrost it in the fridge if you do this.
Why did I use these flours?
As I mentioned earlier, I’m on a buckwheat kick, because I love the flavour it imparts and the structure it contributes to baked goods, especially when used in conjunction with other flours. It also adds a more rustic visual touch to the pastry, which I think is a nice foil for a more country-style dessert such as this galette. It also adds nutritional value to the pastry, being chock full of protein, vitamins and minerals.
This flour combination also uses sorghum in roughly equal proportions to the buckwheat. Sorghum is mild tasting, but most importantly for this pastry recipe, has a great binding quality which is great in pastry and cookies. Another option would be amaranth flour, but it is quite strong tasting and would overwhelm the buckwheat. I tried this with all buckwheat, but preferred the texture with sorghum, and I also tried using millet which gave great taste and texture, but was much harder to work with, so would be more suitable as a press-in crust for a tart.
Sweet rice flour (also called glutinous rice flour – but has NO gluten) is a great gluten-free pantry staple. It is the same flour used to make mochi – the Japanese rice cakes. Because it is naturally sticky, it enables you to lighten the pastry without relying as heavily on starches, and IMO gives a better, less gummy texture than a starch-heavy pastry recipe. This also has the benefit of giving you binding while being able to cut down the amount of xanthan gum used.
Finally I’ve used a small amount of cornstarch, which in conjunction with the tablespoon of sugar, will help promote a browner crust. Many of the gluten-free flours don’t brown as readily as wheat flours, and need a little help.
Forming the galette
A single recipe will enough for 2 8-9″ galettes, or be enough for a double pie-crust. If you are just making 1 galette and don’t want extra pastry, half the recipe.
To form the galette, it is easiest if you are able to roll it out on whatever you will be baking it on – parchment or a silpat liner. The whole thing can then be easily slid onto a baking sheet without disturbing it. This pastry will be a little more delicate than a wheat pastry, so the less you have to move it around, the better-looking your final result will be.
Lightly flour the surface of your parchment and place the flattened disc of dough in the centre. Dust the top with flour, and roll it out into a 12″ circle.
Place the prepared fruit in the centre of the circle, spreading it out to about 9″. Gently fold up the edges, firming the pleats of pastry with your hands as you go. Remember this is supposed to be rustic-looking. Brush the pastry with a bit of egg wash or milk if you like and dust with sugar before baking.
This will work with any summer fruit, so keep an eye out in the markets for seasonal stonefruits – peaches, plums, cherries – and switch things up as the summer unfolds

Ingredients
- Pastry (double recipe):
- 1 cup sweet rice flour
- 1/2 cup buckwheat flour
- 1/2 cup sorghum flour
- 1/2 cup cornstarch
- 2 T granulated sugar
- 1 tsp xanthan gum
- 1/2 teaspoon sea salt (i use Bob's Red Mill - a nice fine texture)
- 12 T cold butter (1 1/2 sticks)
- 1 egg, beaten, plus more for egg wash
- up to 1/2 cup cold water as needed to bring the pastry together.
- Filling (for 1 galette):
- 5 cups summer stone fruit, cut into pieces
- 1/2 cup granulated sugar, or organic cane sugar, or sweetener of your choice
- 1 tsp ground coriander
- 1/4 tsp ground cardamom
- 2 T tapioca starch
Instructions
- Combine all the dry ingredients in a medium bowl and whisk until well combined.
- Cut the butter or shortening into smaller pieces and add to the bowl. Cut the butter into the flours until it becomes crumbly with the largest pieces about the size of a pea.
- Gradually add the egg, and then the water, cutting it in with a knife or a fork, to make sure it is well distributed. It will still look curmbly, but when it has sufficient moisture, it will hold together easily if you squeeze a handful together. At this point, a little wetter is better than dryer - you can always add more flour during the next step.
- Dump the whole mess out onto a clean, smooth countertop or large silpat mat. Heap the pile together gently with a bench scraper, and then with the heel of your hand, push down and away from you - you want to shear those pieces of butter into the pastry so they become thin sheets. Keep using the bench scraper to bring the pile together, and work the pastry in the same direction away from you until it starts to hold together in a ball. If you have a wetter dough, you can sprinkle some buckwheat flour into the mix as you go.
- Once mixed, divide the dough into 2 pieces, and shape them into flattened discs. Wrap it well in plastic wrap or in an airtight ziploc bag, and let it chill in the fridge for at least 1 hour, preferably overnight.
- While the pastry is resting, prepare your fruit.
- Remove the pits from your stonefruit, and cut into slices and place in a bowl big enough for mixing
- Add sugar, tapioca starch and spices, and mix gently with a spatula until all the fruit is thoroughly mixed with everything and you can no longer see dry tapioca starch.
- Remove a single portion of dough from the fridge 30 minutes prior to rolling it out.
- Place the dough on a parchment sheet or silpat, dusted with buckwheat flour. Dust the top with flour, and roll it out into a 12" circle.
- Place the fruit in the middle of the circle and form it into a 9" heap.
- Gently bring the pastry up over the edges of the fruit, pleating gently as you go. Use your fingers to firm it in place.
- Give the pastry a brush with egg wash, and sprinkle with sugar.
- Let the formed galette rest in the fridge while the oven preheats.
- Preheat oven to 400F
- Bake the galette for 30 minutes at 400 on the lowest rack in the oven. Lower heat to 350 and continue to bake another 15 minute until the centre is bubbling,
A note about the Cuisine Soleil flours: They are milled and packaged in Canada, in a facility free of the 9 major allergens, including wheat, gluten, soy, eggs, lactose and corn. Furthermore they are independently tested to contain <5 ppm gluten, making them ideal baking ingredients for anyone with, or baking for, someone with Celiac disease. I have been using a number of their products for over a year now, including the buckwheat flour, the brown rice flour (not quite as finely milled as El Peto’s but definitely a finer grind than Bob’s Red Mill or Lundberg), the tapioca starch, the chickpea flour and the millet flour.
Disclaimer: I am NOT paid to endorse these products in any way whatsoever, and all opinions are my own.
]]>
In the food blogging world, top ten recipe posts abound, and the personal development blogosphere is rife with posts that begin with “the (XX) things you can do to improve (YY)”. I promise you will see none of that here on Real Food Made Easy! (Do I sound weary?! its because I am … a little bit ).
This holiday season has been a tough one in a number of ways. This Xmas marks the 5th one since we lost our son Adam, and while time sloughs off some of the rough edges of loss, it never really heals over, and always seems a little more raw and exposed during the holidays. Five years seems particularly poignant and charged, for no reason in particular, and we’ve found some solace in stepping back from the fray a bit.
[gard align=center]
I’ve also been a bit more frantic w0rk-wise than usual, waiting for my baking space to pass through the necessary hurdles, so I can move in and get a proper start on things. Being in limbo whilst everything else is going a full-tilt is discombobulating, to say the least! In addition, we’ve been waiting to hear about Jeffrey’s surgery date – originally slated for early October, now for January (with the proviso that an emergency case could still bump him back!). That combined with other less major encounters 0f a personal sort over the holidays have made for a considerably less perky than usual disposition on my end ;).
So crankiness, and my personal gripes with the linkbaiting “top XX” kind of blog posts aside, I was scrolling through some of my own 2013 recipe posts over on Google+, and realized, to my chagrin, that this one in particular, had never made it to the blog even though its pretty much a standard now!!!
… And seeing as its nearly New Year’s Eve, and there’s nothing more spectacular (and easy) to start the year off with, than a Prime Rib Roast! and nothing goes better with a nice Roast Beast, than Yorkshire puddings, here you go! May your 2014 be filled with love and kindness (and a Yorkshire pudding or two!)
The method for doing these up Gluten Free is very similar to the method I always used for wheaty Yorkshire puddings. I mix up the batter in the blender, let it stand for at least 60 minutes so the flour is fully hydrated (for maximum stretch), start with a HOT baking pan, with hot beef drippings (duck fat also works great), and fill the pans no more than 1/2 way, otherwise there is too much mass for the delicate structure to support.

Ingredients
- 1/3 cup brown rice flour
- 1/3 cup cornstarch
- 1/3 cup tapioca starch
- 1 tsp potato flour
- 2 T sweet rice flour
- 1/4 tsp xantham gum
- 1/2 tsp salt
- 1 1/4 cups half and half
- 4 eggs
- 2 T melted butter
Instructions
- Place all ingredients in a blender and blend on medium-high speed for about 60 seconds until the mixture is smooth and the consistency of a crepe batter. let stand at least 60 minutes before making the Yorkshire puddings.
- about 30 minutes before cooking the Yorkshires (while your roast beef is resting), heat the oven to 425 F
- When the oven is hot, preheat an empty muffin tin for about 5 minutes. Add in 1 tsp beef drippings OR duck fat, and heat for another 5 minutes.
- Pour the Yorkshire batter into the hot fat in the empty muffin wells - no more than 1/2 way.
- Immediately put back in the oven at 425F for 20 minutes. Lower heat to 350F and bake for another 5-10 minutes. The centres should be just barely set, but still nice and moist inside.
]]>
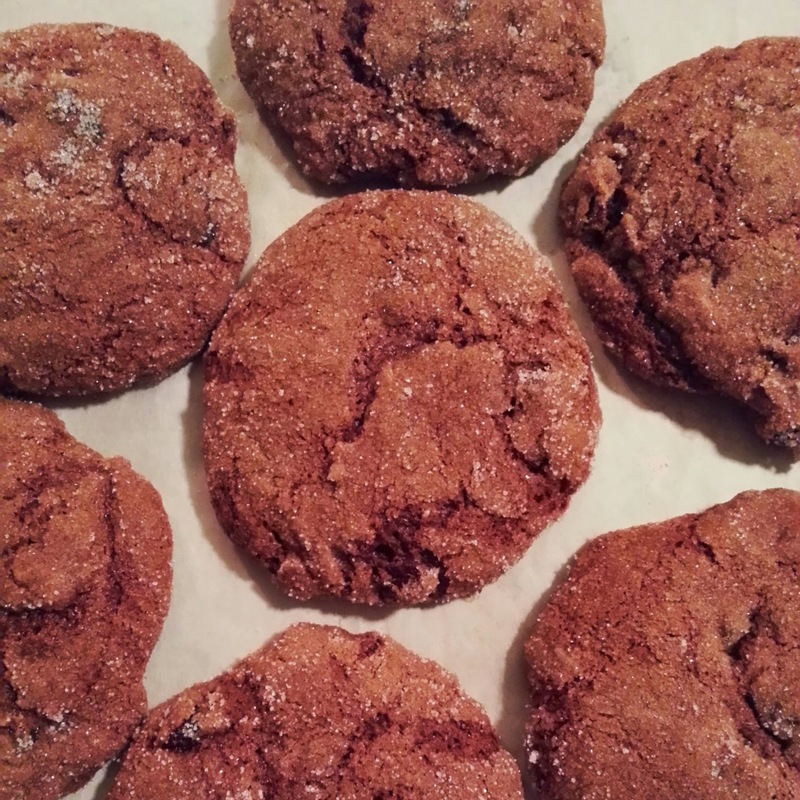 Its holiday time, and that means baking! Fancy treats abound at this time of year, but I find that people ALWAYS come back for a great cookie … and THESE are a great cookie!
These cookies are a simple molasses crinkle cookie amped up with some diced ginger. Dark and ginger-ey, they bake up with that classic crinkled top – they are one of the more popular cookies to come out of my kitchen! Most folks don’t even know they are gluten-free!
A word about flours: if you use very finely milled Chinese or Thai style sweet rice flour, you will find you need a bit less to achieve the perfect texture. If you use a Japanese style sweet rice flour (such as Koda Farms Mochiko flour), you will need the full 120 grams.
[gard align=center]
To achieve maximum chewiness, make sure you beat the cookie batter for about 60 seconds – this helps the xanthan gum achieve maximum stretch (which is also why you don’t need very much)
A healthy dose of molasses in these keeps these cookies soft and chewy, and if stored in an airtight container, they stay nice and moist for a few days. This recipe also doubles easily (make the dough up in a stand mixer if you choose to double it!), leaving lots of extras to nibble on!
- Wet:
- 113 grams butter, softened (1 stick)
- 99 g molasses
- 126 grams granulated sugar
- 55 g eggs (1 large)
- 1 tsp vanilla
- Dry:
- 60 g teff flour
- 60 g sorghum flour
- 120 g sweet rice flour
- 30 g tapioca starch
- ½ tsp xanthan gum
- 1 tsp baking soda
- 2 tsp ground ginger
- 1 tsp cinnamon
- ½ tsp allspice
- ¼ tsp black pepper
- ¼ tsp salt
- 125 grams raisins
- 100 g candied ginger, diced
- Additional granulated sugar for rolling the cookies.
- Preheat oven to 350F
- Add the butter, molasses and sugar to a medium bowl, and cream together with a hand mixer until well combined. Add the egg and vanilla.
- Combine the dry ingredients in a small bowl, and whisk well to combine.
- Add the dry ingredients to the wet, and mix with the hand mixer for 60 seconds, until the batter is smooth and thick.
- Fold in the raisins and diced ginger.
- Scoop out in 2T portions into the additional granulated sugar (a #24 dasher). Roll around in the sugar to coat completely. Place the cookie dough on a parchment-lined cookie sheet. Flatten the balls slightly before baking.
- Bake for 14 minutes (7 minutes on the top rack, 7 on the bottom). Remove from the oven and let cool completely on the cookie sheet before storing in an airtight container.
]]>
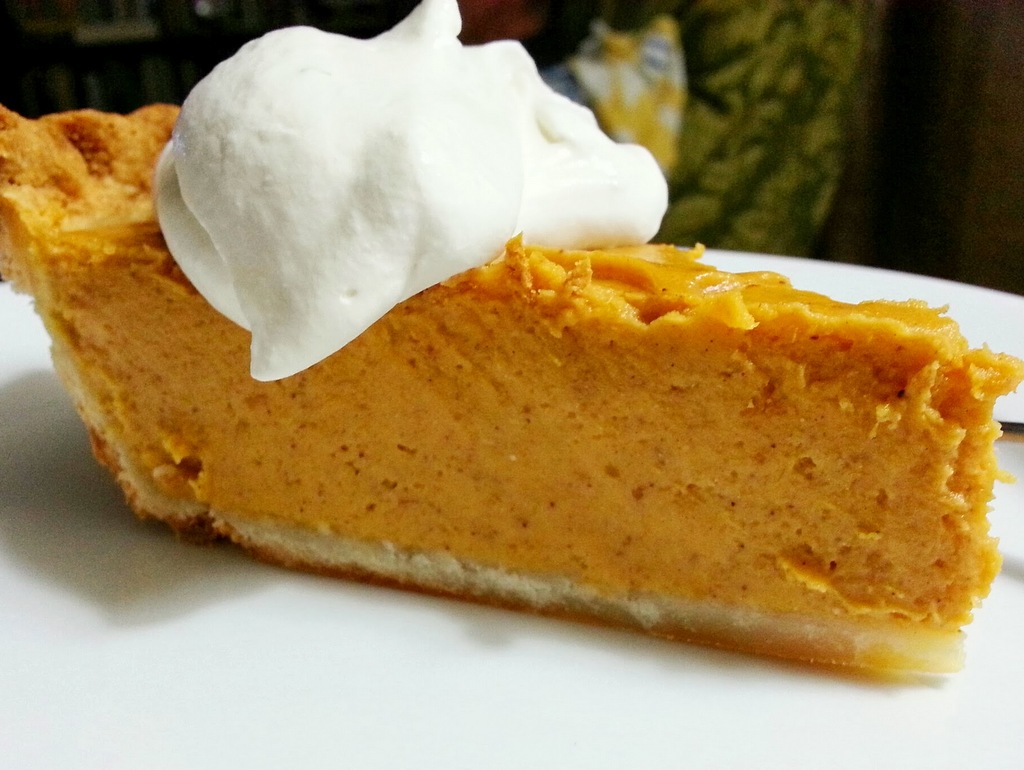 Sometimes, you just need to kick things up a notch, and pie crust is no exception!
I have a few basic pastry recipes that work great for everyday pies, turnovers and pot pies – you know, the ones that follow the basic formula of 3 parts flour: 2 parts fat: 1 part liquid, and they are tasty, and certainly get the job done. BUT! sometimes, you just need to take things up a notch – either because you are celebrating something special, or because the filling requires nothing less!
This gluten-free pastry is one I make often. Its rich, satisfying, has the consistency of a flaky shortbread cookie, and makes a perfect base for fruit pies (if I do say so!). Its also shines as a foil for any rich meaty filling, such as tourtiere, and is also easy to add a bit of extra sugar to, for a sweet shortcrust.
[gard align=center]
For those of you who have attempted gluten-free pastry and felt frustrated at how difficult it can be to handle, this one might just be for you! The additional dairy in it definitely helps create a nice structure that rolls out easily and is relatively easy to handle. Making the pastry the night before and allowing all the flours to fully hydrate makes for a very nice dough to work with. I have not tried a dairy-free version of this, so if anyone does, please let me know what substitutions you make)
Ingredients
- 2/3 cup finely ground brown rice flour (I use El Peto, I find Bob's Red Mill and Lundberg too coarse)
- 2/3 cup sweet rice flour
- 2/3 cup cornstarch or arrowroot powder
- 2/3 cup tapioca starch
- 1 T granulated sugar
- 1 T xanthan gum
- 1 tsp salt
- 1 tsp baking powder (I use Bob's - its double-acting and GF)
- 8 oz. cream cheese
- 8 oz. (2 sticks) unsalted butter
- 1 egg, beaten or enough to moisten the dough (approx 1/4 cup).
Instructions
- Place all the dry ingredients in the bowl of a food processor. Pulse several times to thoroughly mix everything together.
- Cut the cream cheese and butter into small (1/2" cubes). Add the cream cheese and pulse 30-45 seconds until it is well mixed in,
- Add the butter, and pulse 15-20 seconds leaving a few pea-sized pieces.
- Add the egg, pulsing until the mixture just comes together. Turn out onto a mat dusted with a bit of brown rice flour, and knead it lightly until it forms a ball.
- Wrap in plastic wrap and chill until needed.
- To roll out, remove from the fridge and let it come up to room temperature
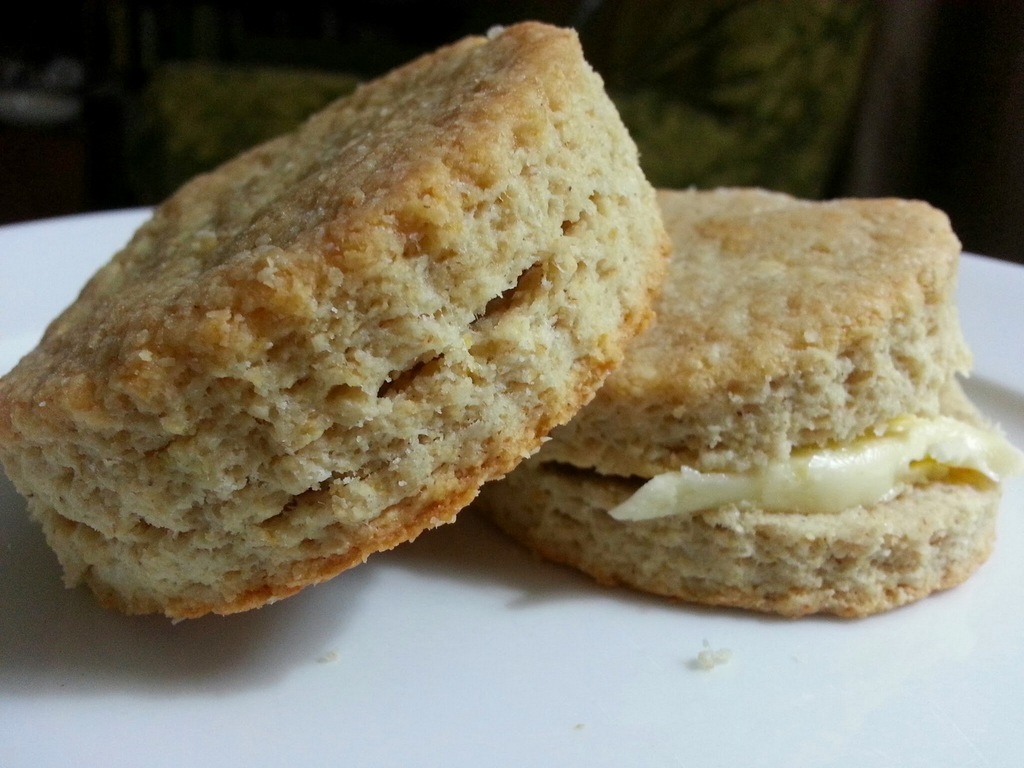 Looking back through my list of posts, I seem to have a thing for multiples – there’s a couple of versions of banana bread, I’ve done a few pancake variations, and it appears now biscuits are joining the list!
These evolved last night as a result of a bit of improvisation, and the discovery of an unopened bag of Only Oats flour on the pantry shelf yesterday afternoon.
This is a recipe for those of you able to tolerate oats. Only Oats are a Canadian product, grown in dedicated, wheat-free fields, harvested with dedicated combines and milled in wheat-free facilities. The flour is lovely – it provides a nice moist, tender crumb to baking. If you can’t tolerate oats, you could make a very similar flour by blitzing buckwheat flakes or buckwheat groats in a spice or coffee grinder.
This is part-recipe and part method. The flaky layers are achieved mainly through folding and rolling the dough multiple times, similar to puff pastry, but less labour intensive. This is especially important with the oat flour, since it has a tendency to bake up … well, like oatmeal!
[gard align=center]
My starting point for this recipe was to use Michael Ruhlman‘s basic biscuit ratio of 3:1:2 (by weight, 3 parts flour: 1 part fat: 2 parts liquid). I ended up tweaking it a bit as I went, increasing the fat slightly, and increasing the liquid since I had added gums.
Now for the process part! You will need a rolling pin and a flat surface to roll the dough out. You are going to cut the butter in with a pastry cutter, leaving pea-sized lumps of butter in the mix. By rolling this out to about 1/2″ thick and folding it over on itself, you are going to get successively thinner sheets of butter in the dough. Make sure to roll it, rather than knead it, as you want the butter melding into the dough in those thin horizontal layers. It sounds more complicated than it actually is, and you will find that a couple of turns of the dough will get you an increasingly supple dough. While this sounds like a lot of work, it does go fairly quickly by hand, and you can have biscuits ready and on the baking sheet within the time it takes to preheat your oven.
Ingredients
- 1 cup Janice's bread flour blend* or other general purpose GF blend
- 1 cup oat flour (use a certified wheat-free brand)
- 1/2 cup (1/4 lb) cold, unsalted butter
- 1 tsp salt
- 3/4 tsp xanthan gum
- 1 T baking powder
- 3/4 cup - 1 cup half and half
Instructions
- Preheat oven to 375 degrees
- In a medium bowl, combine all the dry ingredients and whisk well to combine.
- Cut the cold butter in cubes, and cut into the dry ingredients with a pastry cutter, leaving a few pea-sized pieces.
- Add the half and half or milk to the mixture, starting with 3/4 cup and adding more as needed to bring the dough together.
- Empty out onto a counter or silpat mat dusted with oat flour. Bring together any loose scraps into a cohesive ball and roll out until about 1/2" thick. It will be rough to begin, but become more supply as you roll it.
- Fold the dough over on itself in thirds, and roll out again ... repeat at least once more, and up to 5 times. If you roll more than twice, chilling the dough for 30 minutes in between will help.
- Roll out to 1/2" thick one last time and cut out biscuits with a biscuit cutter (or use a knife to cut squares or triangles. Place on a parchment-lined baking sheet. Brush with egg or melted butter. Bake for 25-30 minutes.
Notes
*Janice's bread flour blend 1/2 cup finely ground brown rice flour 1/2 cup potato flour 1 cup sorghum flour 1 cup garfava flour 3 cups tapioca starch 3 cups cornstarch or arrowroot powder or potato starch
Variations of these biscuits could be made with buttermilk instead of the half and half for a slightly fluffier biscuit. Reduce the baking powder to 1 tsp, and add 1/2 tsp baking soda to the dry ingredients. For a more "scone" like version, add 1 egg to the liquid ingredients, while reducing the half and half by 1/4 cup. For a dairy-free version, use a stick-vegan shortening such as Earth Balance buttery sticks, and a non-dairy milk. You will need to reduce the salt to about 1/2 teaspoon.
]]>
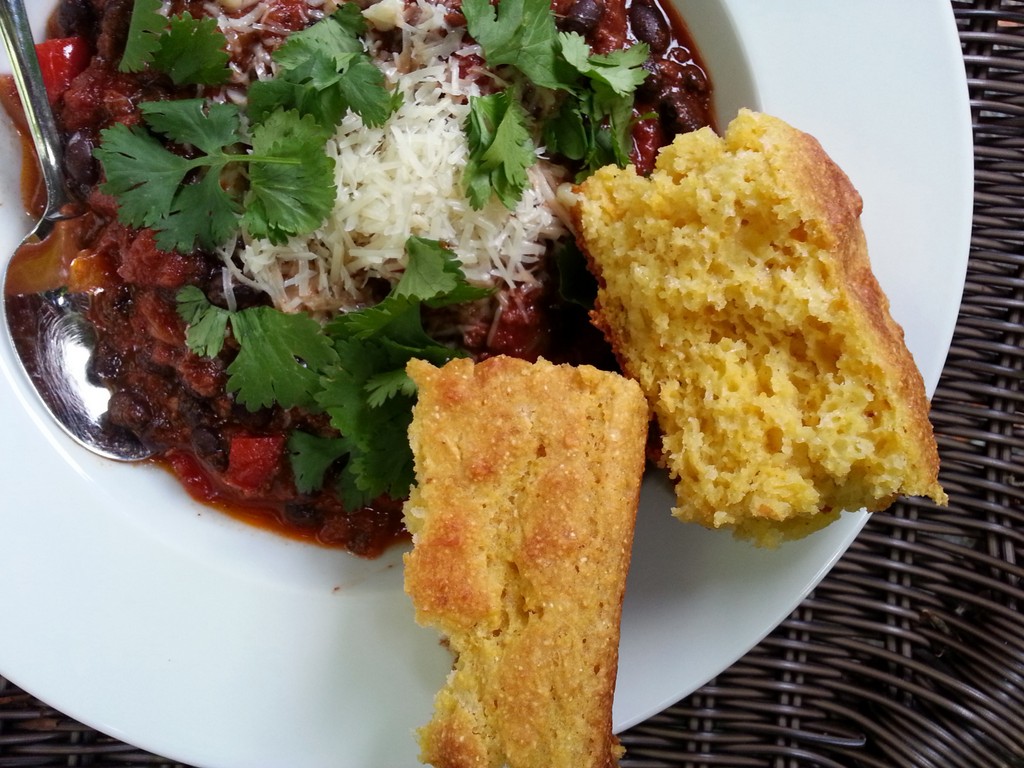 For some reason I thought I had posted this cornbread recipe, but apparently not! I’ve made it so often since developing the recipe I just assumed I had, so when Shinae Robinson announced her November Cookalong over on Google+ included corn muffins, I came here to find the recipe … and nothing! So in the interests of having some tasty gluten-free muffin options to go along with her November Chorizo Chili, Squash soup and Corn muffin cookalong I offered up my recipe for Buttermilk corn muffins.
Just a bit of blather here before I launch into the recipe itself … I happen to love moist fluffy cornbread, and prior to creating this recipe, most of the GF versions I had seen were either the dense, cooked in a cast iron skillet versions, OR they were quite cakey, not very corn-like, and tended to become quite dry and crumbly on sitting out for a day. I was after that kind of cornbread that uses a tin of creamed corn in it! however, most creamed corn is actually not GF, due to the modified cornstarches they contain (NOTE: any modified starch in an ingredients list is a keyword for those needing a safe GF product!). So my starting point when thinking about how to get maximum corn flavour, was to start with actual corn!
Anyhoo, we’ve recreated that creamed corn content by blitzing some thawed frozen corn niblets with all the other wet ingredients in a blender … and I have to say it works brilliantly. This batter is quite sloppy, but don’t despair, it will bake up nice and tall and fluffy and moist. Instructions in the recipes are for an 8″ square pan, but you can also bake these in muffin tins or tiny loaf pans – use a #12 scoop to portion it out, and check for doneness starting at 18-20 minutes.
This uses a bread flour blend that I use in a number of my baking recipes, so if you see things in my feed you like, note that I’m testing as many of my baked goods recipes as I can with this blend with the plan of publishing them shortly (buckwheat muffins, this cornbread, upside-down cake, Liege waffles, biscuits – to name a few off the top of my head). Now go, check out the cookalong – ask to join the Google+ Cookalong Community, and in the words of the Chairman – ALLEZ CUISINE!
Ingredients
- 1 cup GF Janice's bread flour blend* or another good GF flour blend without gums (144 grams)
- 1 cup cornmeal (Bob's Red Mill or El Peto are my favourites)
- 2 T granulated sugar
- 1/2 tsp xantham gum
- 1 tsp baking soda
- 1 tsp double acting baking powder (Bob's Red Mill or Fleishman's are both good GF options)
- 3/4 tsp salt
- 1 cup buttermilk
- 2 eggs
- 2 T melted butter or oil
- 1 1/2 cups corn niblets (frozen and thawed is fine)
Instructions
- Preheat oven to 350 degrees
- Line an 8" square pan with parchment paper
- Combine all the dry ingredients in a medium bowl and whisk well to combine everything.
- Put the buttermilk, eggs, butter or oil and corn in a blender and blitz until the corn is broken down and pureed with all the other wet ingredients.
- Pour the contents of the blender into the bowl with the dry ingredients and mix with a spatula or flat whisk to fully incorporate everything. The batter will be a bit wet - the consistency of a thick pancake batter.
- Bake for 25-30 minutes until the centre springs back and the edges just start to pull away from the sides.
- Let cool on a rack for at least 30 minutes before cutting,
Notes
*Janice's bread flour blend combine in a bowl and mix well with a whisk. Store in an airtight container or ziploc bag 1 cup brown rice flour 1 cup potato flour 2 cups sorghum flour 2 cups garfava flour 6 cups potato starch 6 cups tapioca starch
OR another good flour blend for this is: 1 cup garfava flour 1 cup raw buckwheat flour (blitz raw buckwheat groats in a spice grinder) 1 cup potato starch 1 cup tapioca starch
 Pickles are one of those things that we often associate with summer. The whole “putting food by” image of things in jars usually leads to jam … and pickles.
But did you know that while we use the word pickle as a noun, it is also a verb … and one that can applied to all kinds of things we don’t normally associate with “pickle”
Pickling merely refers to the process of changing the acidity of foods to a ph of less than 4.6 to preserve it — either through lactofermentation (as with kosher dills), or by applying an acid like vinegar. Pickling is experiencing a bit of a resurgence these days, as people discover how easy it is to DIY (its even been spoofed on Portlandia!!!)
[gard align=center]
The great thing about pickling is that its one of those home-preserving projects that is lower risk. Between the salt, the sugar, and the vinegar, the risks of foodborne illness are much less than if you try your hand at pressure canning meats or low acid vegetables.
Another bit of food trivia, is the addition of pickles on a plate adds a bit of flavour contrast, for an automatic balancing of flavours. South Asian cultures have known this for centuries, with lots of little chutneys served as side dishes, here in North America we have a tradition of pickled beets, sweet mustard pickles and dill pickles, and in Scandanavian countries, they go the extra mile and pickle proteins such as herring.
So pickles perk up your food, but historically, they were also eaten as part of a meal to aid digestion. Naturally pickled or fermented foods are loaded with beneficial probiotics, but even eating foods pickled in cider vinegar has digestive benefits, as the acidity stimulates acid production in your stomach, which will break down your food more quickly and boost the absorption of the nutrients in your food! Its an interesting turn of events where our taste buds and our tummies are completely in tune with each other!!!
This pickle is a quick one I do in smaller batches and keep in the fridge, but I have increased the quantities and canned it in a hot water canner for the recommended amount of time (Bernardin has a step-by-step guide to home canning). If you go that route, make sure you pack the pickle in the jar so there are no air bubbles. It does not have a lot of brine, so really press it down as you fill your jar to remove any air pockets. This will keep for several weeks in the fridge.
Ingredients
- 1/4 cup vegetable oil
- 5-6 cloves garlic, minced
- 1 T fenugreek seeds
- 1 T cumin seeds
- 1 T black mustard seeds
- 1 T Madras curry powder
- 1/2 tsp cayenne pepper
- 1/2 tsp smoked paprika
- 1 c cider vinegar
- 1/2 cup water
- 1 T salt
- 2 T sugar or honey
- 5-6 cups eggplant, cut into 3/4" cubes
- 1 T ginger, minced or grated
Instructions
- Heat the oil in a large saucepan over medium-high heat, and add the seeds, stirring until the mustar seeds begin to pop.
- Add the curry powder, stirring for 30 seconds while it toasts, then add the eggplant and garlic, lower the heat to medium, stirring for 3-4 minutes.
- Add all the other ingredients, stirring to combine everything. Turn the heat to medium-low and simmer for 20-30 minutes until the eggplant pieces are soft and cooked through.
- Spoon into sterilized glass jars and store in the fridge OR process in a hot water canner for the recommended amount of time for the size of your jars.