As another year winds down, the mood on Social Media turns melancholic as people begin reflecting on the past years achievements, what the biggest gaffes on twitter were, the year’s tech hits and misses, and whether the year ahead holds any sea changes (rumour haz it the kidz r not diggin the facebook any more!)
In the food blogging world, top ten recipe posts abound, and the personal development blogosphere is rife with posts that beginwith “the (XX) things you can do to improve (YY)”. I promise you will see none of that here on Real Food Made Easy! (Do I sound weary?! its because I am … a little bit ![]() ).
).
This holiday season has been a tough one in a number of ways. This Xmas marks the 5th one since we lost our son Adam, and while time sloughs off some of the rough edges of loss, it never really heals over, and always seems a little more raw and exposed during the holidays. Five years seems particularly poignant and charged, for no reason in particular, and we’ve found some solace in stepping back from the fray a bit.
I’ve also been a bit more frantic w0rk-wise than usual, waiting for my baking space to pass through the necessary hurdles, so I can move in and get a proper start on things. Being in limbo whilst everything else is going a full-tilt is discombobulating, to say the least! In addition, we’ve been waiting to hear about Jeffrey’s surgery date – originally slated for early October, now for January (with the proviso that an emergency case could still bump him back!). That combined with other less major encounters 0f a personal sort over the holidays have made for a considerably less perky than usual disposition on my end ;).
So crankiness, and my personal gripes with the linkbaiting “top XX” kind of blog posts aside, I was scrolling through some of my own 2013 recipe posts over on Google+, and realized, to my chagrin, that this one in particular, had never made it to the blog even though its pretty much a standard now!!!
… And seeing as its nearly New Year’s Eve, and there’s nothing more spectacular (and easy) to start the year off with, than a Prime Rib Roast! and nothing goes better with a nice Roast Beast, than Yorkshire puddings, here you go! May your 2014 be filled with love and kindness (and a Yorkshire pudding or two!)
The method for doing these up Gluten Free is very similar to the method I always used for wheaty Yorkshire puddings. I mix up the batter in the blender, let it stand for at least 60 minutes so the flour is fully hydrated (for maximum stretch), start with a HOT baking pan, with hot beef drippings (duck fat also works great), and fill the pans no more than 1/2 way, otherwise there is too much mass for the delicate structure to support.

Ingredients
- 1/3 cup brown rice flour
- 1/3 cup cornstarch
- 1/3 cup tapioca starch
- 1 tsp potato flour
- 2 T sweet rice flour
- 1/4 tsp xantham gum
- 1/2 tsp salt
- 1 1/4 cups half and half
- 4 eggs
- 2 T melted butter
Instructions
- Place all ingredients in a blender and blend on medium-high speed for about 60 seconds until the mixture is smooth and the consistency of a crepe batter. let stand at least 60 minutes before making the Yorkshire puddings.
- about 30 minutes before cooking the Yorkshires (while your roast beef is resting), heat the oven to 425 F
- When the oven is hot, preheat an empty muffin tin for about 5 minutes. Add in 1 tsp beef drippings OR duck fat, and heat for another 5 minutes.
- Pour the Yorkshire batter into the hot fat in the empty muffin wells - no more than 1/2 way.
- Immediately put back in the oven at 425F for 20 minutes. Lower heat to 350F and bake for another 5-10 minutes. The centres should be just barely set, but still nice and moist inside.
]]>
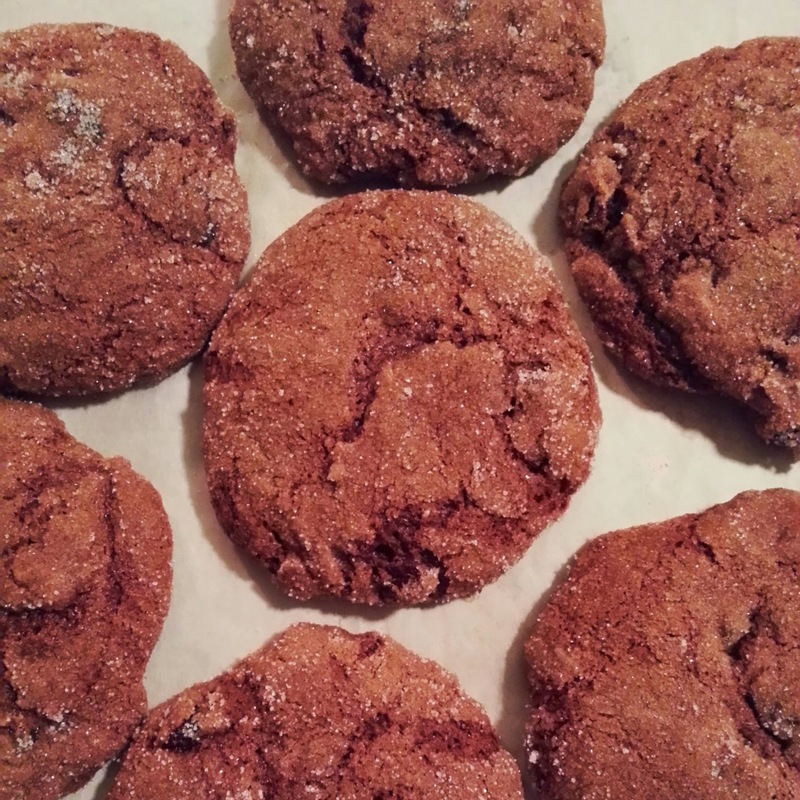 Its holiday time, and that means baking! Fancy treats abound at this time of year, but I find that people ALWAYS come back for a great cookie … and THESE are a great cookie!
These cookies are a simple molasses crinkle cookie amped up with some diced ginger. Dark and ginger-ey, they bake up with that classic crinkled top – they are one of the more popular cookies to come out of my kitchen! Most folks don’t even know they are gluten-free!
A word about flours: if you use very finely milled Chinese or Thai style sweet rice flour, you will find you need a bit less to achieve the perfect texture. If you use a Japanese style sweet rice flour (such as Koda Farms Mochiko flour), you will need the full 120 grams.
To achieve maximum chewiness, make sure you beat the cookie batter for about 60 seconds – this helps the xanthan gum achieve maximum stretch (which is also why you don’t need very much)
A healthy dose of molasses in these keeps these cookies soft and chewy, and if stored in an airtight container, they stay nice and moist for a few days. This recipe also doubles easily (make the dough up in a stand mixer if you choose to double it!), leaving lots of extras to nibble on!
Ingredients
- Wet:
- 113 grams butter, softened (1 stick)
- 99 g molasses
- 126 grams granulated sugar
- 55 g eggs (1 large)
- 1 tsp vanilla
- Dry:
- 60 g teff flour
- 60 g sorghum flour
- 120 g sweet rice flour
- 30 g tapioca starch
- 1/2 tsp xanthan gum
- 1 tsp baking soda
- 2 tsp ground ginger
- 1 tsp cinnamon
- 1/2 tsp allspice
- 1/4 tsp black pepper
- 1/4 tsp salt
- 125 grams raisins
- 100 g candied ginger, diced
- Additional granulated sugar for rolling the cookies.
Instructions
- Preheat oven to 350F
- Add the butter, molasses and sugar to a medium bowl, and cream together with a hand mixer until well combined. Add the egg and vanilla.
- Combine the dry ingredients in a small bowl, and whisk well to combine.
- Add the dry ingredients to the wet, and mix with the hand mixer for 60 seconds, until the batter is smooth and thick.
- Fold in the raisins and diced ginger.
- Scoop out in 2T portions into the additional granulated sugar (a #24 dasher). Roll around in the sugar to coat completely. Place the cookie dough on a parchment-lined cookie sheet. Flatten the balls slightly before baking.
- Bake for 14 minutes (7 minutes on the top rack, 7 on the bottom). Remove from the oven and let cool completely on the cookie sheet before storing in an airtight container.
]]>
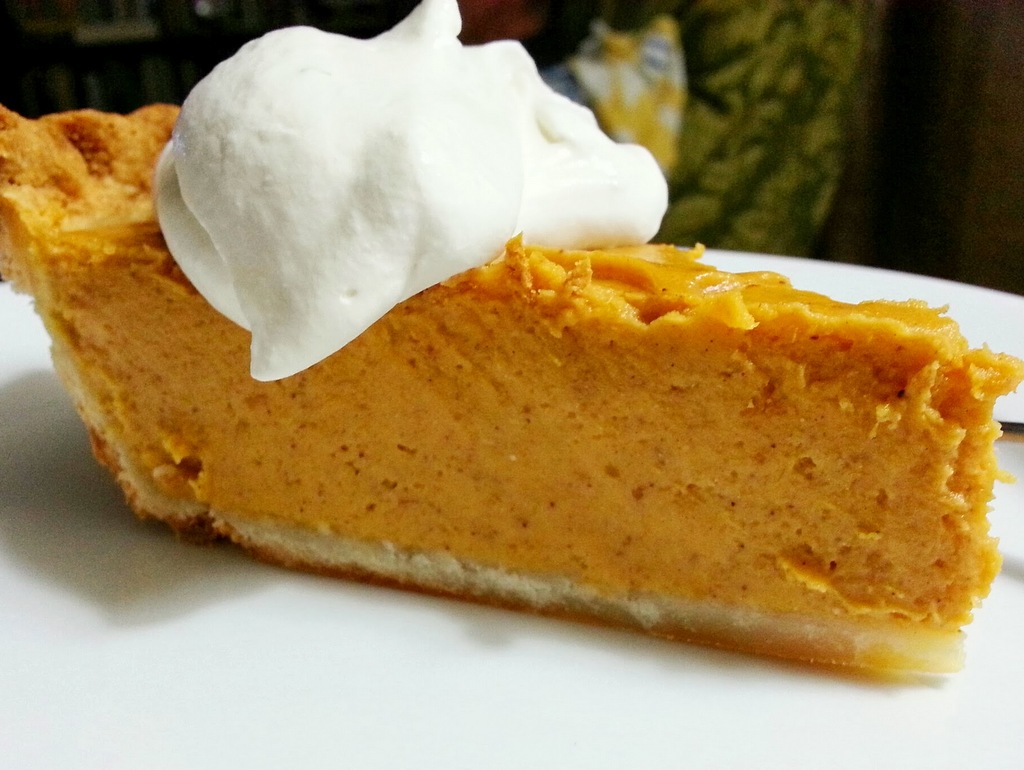 Sometimes, you just need to kick things up a notch, and pie crust is no exception!
I have a few basic pastry recipes that work great for everyday pies, turnovers and pot pies – you know, the ones that follow the basic formula of 3 parts flour: 2 parts fat: 1 part liquid, and they are tasty, and certainly get the job done. BUT! sometimes, you just need to take things up a notch – either because you are celebrating something special, or because the filling requires nothing less!
This gluten-free pastry is one I make often. Its rich, satisfying, has the consistency of a flaky shortbread cookie, and makes a perfect base for fruit pies (if I do say so!). Its also shines as a foil for any rich meaty filling, such as tourtiere, and is also easy to add a bit of extra sugar to, for a sweet shortcrust.
For those of you who have attempted gluten-free pastry and felt frustrated at how difficult it can be to handle, this one might just be for you! The additional dairy in it definitely helps create a nice structure that rolls out easily and is relatively easy to handle. Making the pastry the night before and allowing all the flours to fully hydrate makes for a very nice dough to work with. I have not tried a dairy-free version of this, so if anyone does, please let me know what substitutions you make)
Ingredients
- 2/3 cup finely ground brown rice flour (I use El Peto, I find Bob's Red Mill and Lundberg too coarse)
- 2/3 cup sweet rice flour
- 2/3 cup cornstarch or arrowroot powder
- 2/3 cup tapioca starch
- 1 T granulated sugar
- 1 T xanthan gum
- 1 tsp salt
- 1 tsp baking powder (I use Bob's - its double-acting and GF)
- 8 oz. cream cheese
- 8 oz. (2 sticks) unsalted butter
- 1 egg, beaten or enough to moisten the dough (approx 1/4 cup).
Instructions
- Place all the dry ingredients in the bowl of a food processor. Pulse several times to thoroughly mix everything together.
- Cut the cream cheese and butter into small (1/2" cubes). Add the cream cheese and pulse 30-45 seconds until it is well mixed in,
- Add the butter, and pulse 15-20 seconds leaving a few pea-sized pieces.
- Add the egg, pulsing until the mixture just comes together. Turn out onto a mat dusted with a bit of brown rice flour, and knead it lightly until it forms a ball.
- Wrap in plastic wrap and chill until needed.
- To roll out, remove from the fridge and let it come up to room temperature
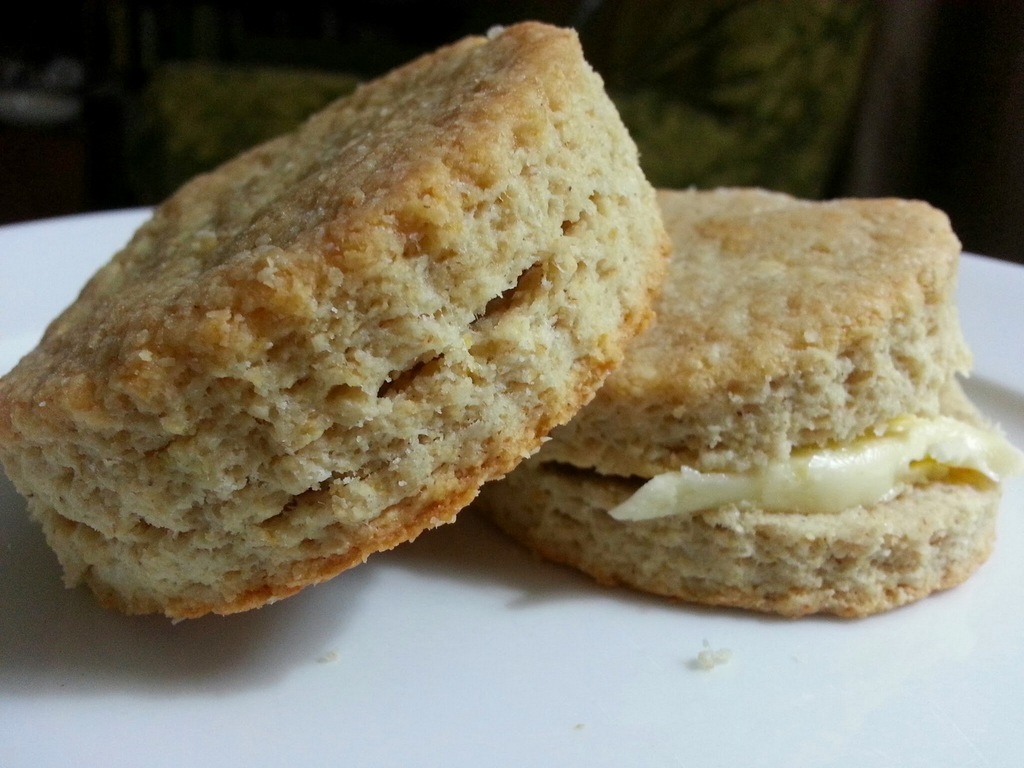 Looking back through my list of posts, I seem to have a thing for multiples – there’s a couple of versions of banana bread, I’ve done a few pancake variations, and it appears now biscuits are joining the list!
These evolved last night as a result of a bit of improvisation, and the discovery of an unopened bag of Only Oats flour on the pantry shelf yesterday afternoon.
This is a recipe for those of you able to tolerate oats. Only Oats are a Canadian product, grown in dedicated, wheat-free fields, harvested with dedicated combines and milled in wheat-free facilities. The flour is lovely – it provides a nice moist, tender crumb to baking. If you can’t tolerate oats, you could make a very similar flour by blitzing buckwheat flakes or buckwheat groats in a spice or coffee grinder.
This is part-recipe and part method. The flaky layers are achieved mainly through folding and rolling the dough multiple times, similar to puff pastry, but less labour intensive. This is especially important with the oat flour, since it has a tendency to bake up … well, like oatmeal!
My starting point for this recipe was to use Michael Ruhlman‘s basic biscuit ratio of 3:1:2 (by weight, 3 parts flour: 1 part fat: 2 parts liquid). I ended up tweaking it a bit as I went, increasing the fat slightly, and increasing the liquid since I had added gums.
Now for the process part! You will need a rolling pin and a flat surface to roll the dough out. You are going to cut the butter in with a pastry cutter, leaving pea-sized lumps of butter in the mix. By rolling this out to about 1/2″ thick and folding it over on itself, you are going to get successively thinner sheets of butter in the dough. Make sure to roll it, rather than knead it, as you want the butter melding into the dough in those thin horizontal layers. It sounds more complicated than it actually is, and you will find that a couple of turns of the dough will get you an increasingly supple dough. While this sounds like a lot of work, it does go fairly quickly by hand, and you can have biscuits ready and on the baking sheet within the time it takes to preheat your oven.
Ingredients
- 1 cup Janice's bread flour blend* or other general purpose GF blend
- 1 cup oat flour (use a certified wheat-free brand)
- 1/2 cup (1/4 lb) cold, unsalted butter
- 1 tsp salt
- 3/4 tsp
- 1 T baking powder
- 3/4 cup - 1 cup half and half
Instructions
- Preheat oven to 375 degrees
- In a medium bowl, combine all the dry ingredients and whisk well to combine.
- Cut the cold butter in cubes, and cut into the dry ingredients with a pastry cutter, leaving a few pea-sized pieces.
- Add the half and half or milk to the mixture, starting with 3/4 cup and adding more as needed to bring the dough together.
- Empty out onto a counter or silpat mat dusted with oat flour. Bring together any loose scraps into a cohesive ball and roll out until about 1/2" thick. It will be rough to begin, but become more supply as you roll it.
- Fold the dough over on itself in thirds, and roll out again ... repeat at least once more, and up to 5 times. If you roll more than twice, chilling the dough for 30 minutes in between will help.
- Roll out to 1/2" thick one last time and cut out biscuits with a biscuit cutter (or use a knife to cut squares or triangles. Place on a parchment-lined baking sheet. Brush with egg or melted butter. Bake for 25-30 minutes.
Notes
*Janice's bread flour blend 1/2 cup finely ground brown rice flour 1/2 cup potato flour 1 cup sorghum flour 1 cup garfava flour 3 cups tapioca starch 3 cups cornstarch or arrowroot powder or potato starch
Variations of these biscuits could be made with buttermilk instead of the half and half for a slightly fluffier biscuit. Reduce the baking powder to 1 tsp, and add 1/2 tsp baking soda to the dry ingredients. For a more "scone" like version, add 1 egg to the liquid ingredients, while reducing the half and half by 1/4 cup. For a dairy-free version, use a stick-vegan shortening such as Earth Balance buttery sticks, and a non-dairy milk. You will need to reduce the salt to about 1/2 teaspoon.
]]>
This particular recipe began life as a Rose Levy Berenbaum recipe (she is a baking genius! if you don't have her books, you should!). It has become the brown-sugar cake base that was used for THIS Persimmon Upside-Down cake.
I'll be talking at more length about my process in a longer blog post tomorrow ![]()
#blog ?
This post has been reshared 1 times on Google+
View this post on Google+
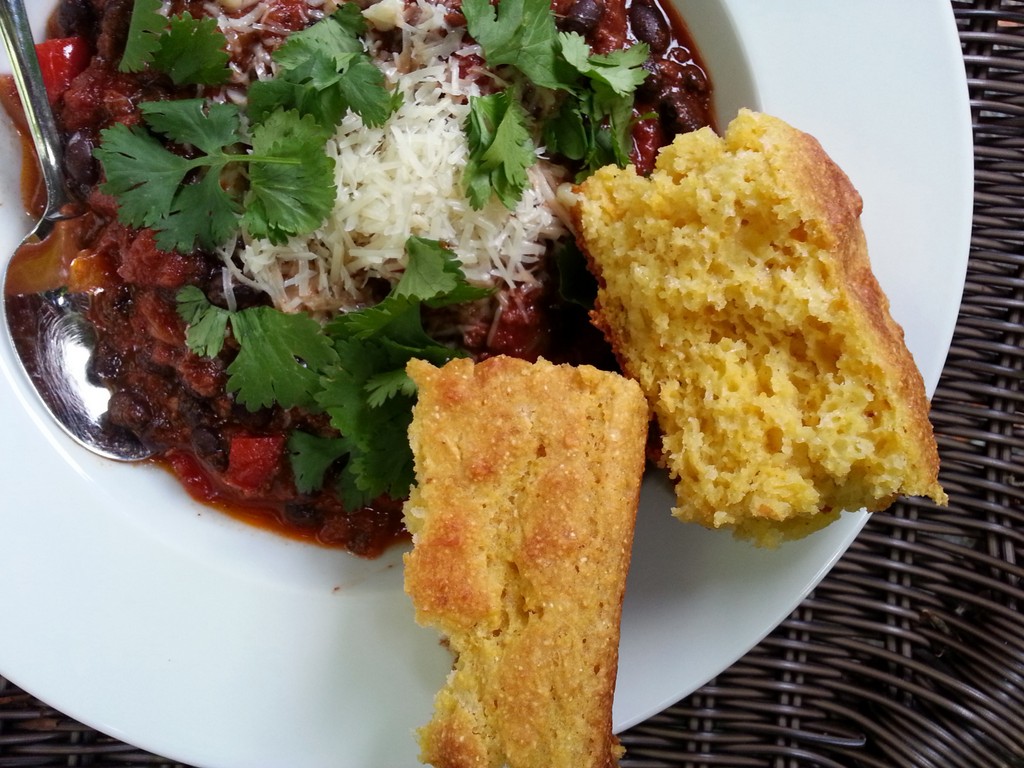 For some reason I thought I had posted this cornbread recipe, but apparently not! I’ve made it so often since developing the recipe I just assumed I had, so when Shinae Robinson announced her November Cookalong over on Google+ included corn muffins, I came here to find the recipe … and nothing! So in the interests of having some tasty gluten-free muffin options to go along with her November Chorizo Chili, Squash soup and Corn muffin cookalong I offered up my recipe for Buttermilk corn muffins.
Just a bit of blather here before I launch into the recipe itself … I happen to love moist fluffy cornbread, and prior to creating this recipe, most of the GF versions I had seen were either the dense, cooked in a cast iron skillet versions, OR they were quite cakey, not very corn-like, and tended to become quite dry and crumbly on sitting out for a day. I was after that kind of cornbread that uses a tin of creamed corn in it! however, most creamed corn is actually not GF, due to the modified cornstarches they contain (NOTE: any modified starch in an ingredients list is a keyword for those needing a safe GF product!). So my starting point when thinking about how to get maximum corn flavour, was to start with actual corn!
Anyhoo, we’ve recreated that creamed corn content by blitzing some thawed frozen corn niblets with all the other wet ingredients in a blender … and I have to say it works brilliantly. This batter is quite sloppy, but don’t despair, it will bake up nice and tall and fluffy and moist. Instructions in the recipes are for an 8″ square pan, but you can also bake these in muffin tins or tiny loaf pans – use a #12 scoop to portion it out, and check for doneness starting at 18-20 minutes.
This uses a bread flour blend that I use in a number of my baking recipes, so if you see things in my feed you like, note that I’m testing as many of my baked goods recipes as I can with this blend with the plan of publishing them shortly (buckwheat muffins, this cornbread, upside-down cake, Liege waffles, biscuits – to name a few off the top of my head). Now go, check out the cookalong – ask to join the Google+ Cookalong Community, and in the words of the Chairman – ALLEZ CUISINE!
Ingredients
- 1 cup GF Janice's bread flour blend* or another good GF flour blend without gums (144 grams)
- 1 cup cornmeal (Bob's Red Mill or El Peto are my favourites)
- 2 T granulated sugar
- 1/2 tsp xantham gum
- 1 tsp baking soda
- 1 tsp double acting baking powder (Bob's Red Mill or Fleishman's are both good GF options)
- 3/4 tsp salt
- 1 cup buttermilk
- 2 eggs
- 2 T melted butter or oil
- 1 1/2 cups corn niblets (frozen and thawed is fine)
Instructions
- Preheat oven to 350 degrees
- Line an 8" square pan with parchment paper
- Combine all the dry ingredients in a medium bowl and whisk well to combine everything.
- Put the buttermilk, eggs, butter or oil and corn in a blender and blitz until the corn is broken down and pureed with all the other wet ingredients.
- Pour the contents of the blender into the bowl with the dry ingredients and mix with a spatula or flat whisk to fully incorporate everything. The batter will be a bit wet - the consistency of a thick pancake batter.
- Bake for 25-30 minutes until the centre springs back and the edges just start to pull away from the sides.
- Let cool on a rack for at least 30 minutes before cutting,
Notes
*Janice's bread flour blend combine in a bowl and mix well with a whisk. Store in an airtight container or ziploc bag 1 cup brown rice flour 1 cup potato flour 2 cups sorghum flour 2 cups garfava flour 6 cups potato starch 6 cups tapioca starch
OR another good flour blend for this is: 1 cup garfava flour 1 cup raw buckwheat flour (blitz raw buckwheat groats in a spice grinder) 1 cup potato starch 1 cup tapioca starch
 Pickles are one of those things that we often associate with summer. The whole “putting food by” image of things in jars usually leads to jam … and pickles.
But did you know that while we use the word pickle as a noun, it is also a verb … and one that can applied to all kinds of things we don’t normally associate with “pickle”
Pickling merely refers to the process of changing the acidity of foods to a ph of less than 4.6 to preserve it — either through lactofermentation (as with kosher dills), or by applying an acid like vinegar. Pickling is experiencing a bit of a resurgence these days, as people discover how easy it is to DIY (its even been spoofed on Portlandia!!!)
The great thing about pickling is that its one of those home-preserving projects that is lower risk. Between the salt, the sugar, and the vinegar, the risks of foodborne illness are much less than if you try your hand at pressure canning meats or low acid vegetables.
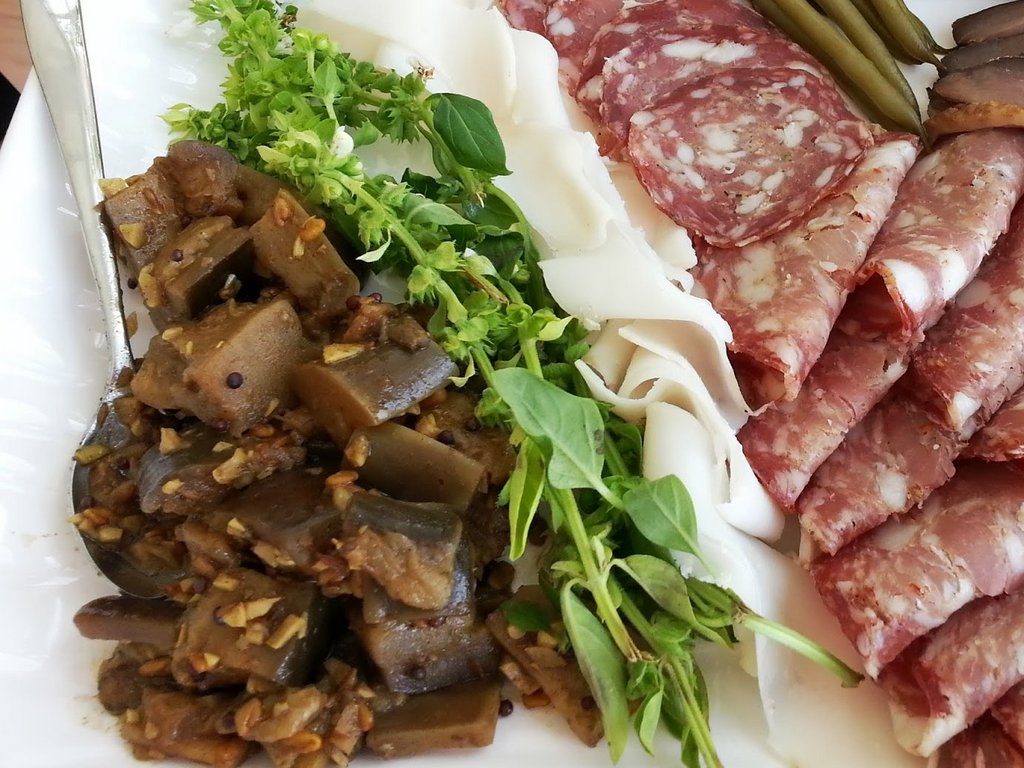
Another bit of food trivia, is the addition of pickles on a plate adds a bit of flavour contrast, for an automatic balancing of flavours. South Asian cultures have known this for centuries, with lots of little chutneys served as side dishes, here in North America we have a tradition of pickled beets, sweet mustard pickles and dill pickles, and in Scandanavian countries, they go the extra mile and pickle proteins such as herring.
So pickles perk up your food, but historically, they were also eaten as part of a meal to aid digestion. Naturally pickled or fermented foods are loaded with beneficial probiotics, but even eating foods pickled in cider vinegar has digestive benefits, as the acidity stimulates acid production in your stomach, which will break down your food more quickly and boost the absorption of the nutrients in your food! Its an interesting turn of events where our taste buds and our tummies are completely in tune with each other!!!
This pickle is a quick one I do in smaller batches and keep in the fridge, but I have increased the quantities and canned it in a hot water canner for the recommended amount of time (Bernardin has a step-by-step guide to home canning). If you go that route, make sure you pack the pickle in the jar so there are no air bubbles. It does not have a lot of brine, so really press it down as you fill your jar to remove any air pockets. This will keep for several weeks in the fridge.
Ingredients
- 1/4 cup vegetable oil
- 5-6 cloves garlic, minced
- 1 T fenugreek seeds
- 1 T cumin seeds
- 1 T black mustard seeds
- 1 T Madras curry powder
- 1/2 tsp cayenne pepper
- 1/2 tsp smoked paprika
- 1 c cider vinegar
- 1/2 cup water
- 1 T salt
- 2 T sugar or honey
- 5-6 cups eggplant, cut into 3/4" cubes
- 1 T ginger, minced or grated
Instructions
- Heat the oil in a large saucepan over medium-high heat, and add the seeds, stirring until the mustar seeds begin to pop.
- Add the curry powder, stirring for 30 seconds while it toasts, then add the eggplant and garlic, lower the heat to medium, stirring for 3-4 minutes.
- Add all the other ingredients, stirring to combine everything. Turn the heat to medium-low and simmer for 20-30 minutes until the eggplant pieces are soft and cooked through.
- Spoon into sterilized glass jars and store in the fridge OR process in a hot water canner for the recommended amount of time for the size of your jars.
This makes up a lot of shepherd’s pie filling, so scale it up or down accordingly. budget approximately 1/2 a potato per serving of shepherd’s pie.
A couple of tips to make your shepherd’s pie perfect:
1. use the widest pan you can find to allow the meat to brown. This will also make the sauce thicken up more quickly
2. Steam your potatoes for the mashed potato topping, and run them through your ricer or food mill, and then stir in the butter and half and half. You can also lighten your mashed potatoes by using buttermilk or chicken stock instead of the half and half.
3. If you are doing these as individual portions you plan to freeze, use a piping bag to pipe the mashed potatoes on top (it makes the layer nice and even and is much quicker).
4. this is a great way to use up seasonal produce – whatever produce you happen to have out of the garden or from the market. Beans and zucchini are a nice addition at this time of year.

Ingredients
- 2 T olive oil
- 3 lbs ground beef
- 4 cups onions, diced
- 2 cups celery, diced
- 4 cups carrots, diced
- 6 cloves garlic, minced
- 2 T Herbs de Provence
- 2 bay leaves
- 2 tsp salt
- 1 tsp black pepper
- 1/2 cup tomato sauce
- 2 T fish sauce
- 2 T gluten-free Worchestershire sauce or Balsamic vinegar
- 1 - 1 1/2 cups water
- 2 c frozen peas
- 1/4 cup buckwheat flour
- 6 russet potatoes
- 4 T butter
- 1 1/2 cups half and half
- 1/2 cup smoked cheddar (optional)
Instructions
- Heat the oil in a large Dutch oven over medium heat. Saute the onions until translucent and lightly browned, about 5-10 minutes.
- Add the garlic, and sweat about 30 minutes then add the celery and onions and saute another 5 minutes. Add the meat, salting as you go, and breaking up the meat as it browns.
- Add the Herbs de Provence, tomato sauce, fish sauce and Worchestershire sauce and water, and stir to mix. Add the bayleaf, cover the pot and reduce the heat and let simmer for 10 minutes until the carrots are cooked through.
- Add the frozen peas, turn the heat back up to medium-high and let cook until the peas are thawed. Then sprinkle the buckwheat flour on top and stir into the mixture, stirring as the filling heats up. It will thicken as it comes to the boil. Once thickened, remove from the heat and let cool slightly while you make the mashed potatoes.
- Preheat oven to 375 F
- Peel and cut the potatoes into large pieces. Place in a steamer basket and steam for 15-20 minutes until you can easily pierce the pieces with a paring knife. Alternately, you can boil the potatoes and drain them.
- Put the potatoes through a food mill or potato ricer. if you put the butter at the bottom of the pot or bowl you are making the mashed potatoes in, the butter will be melted by the time you are ready to stir the mashed potatoes.
- Add salt and pepper, and stir in the melted butter and half and half. if you are using smoked cheddar cheese, this is the time to add it. Dot the top with butter or sprinkle with more cheese.
- Place the filling in a pie plate, and top with mashed potatoes. Bake at 375 for 20 minutes until the filling is bubbling. Finish the shepherd's pie under the broiler to brown the top.
]]>
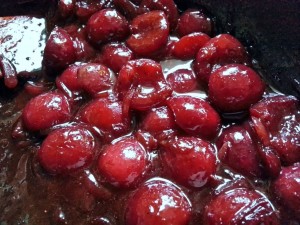
Most people think of cherries as dessert fare, but with their slight tartness, they also pair nicely in savoury dishes – incorporated into rice pilaf with pistachios, providing a bright note in stuffings, or turned into a simple pan sauce as we’ve done here with our salmon.
As an aside, much of the area in our neck of the woods was orchard back in the day. Most larger parcels of land were converted to suburban subdivisions back in the late 1960s/early 1970s, but the fruit trees remained in many back yards. I can remember sneaking over fences – blood pounding in the ears – to pluck the cherries from their branches, still warm from the sun and devour them on the spot! Tree-ripened cherries are a delicious thing, but there is an extra thrill in devouring forbidden fruit!
We’ve paired this sauce with a simple pan-fried salmon filet here, dusted with sumac and coriander, but it would also pair well with pork or chicken! A little something different to jazz up your summertime dinner.

Ingredients
- 1 shallot, finely julienned
- 1 clove garlic, minced
- 1 cup cherries, pitted and halved
- 1-2 T balsamic vinegar
- 1 tsp ground coriander
- 1 T sugar
- salt
- 1 cup liquid (water, stock, whatever is on hand!)
- 2 T butter to finish the sauce
Instructions
- Use the same pan you saute your fish (or pork or chicken) in. The browned bits will help flavour your pan sauce.
- Over medium-high heat, saute the shallots and garlic with a pinch of salt until soft and translucent.
- Add the cherries to the pan and saute until the cherries start to soften and release some of their juice.
- Add the remaining ingredients except for the butter and lower the heat to simmer until the cherries are very soft and the liquid have reduced to about 1/4-1/2 cup. Adjust seasoning as needed.
- Swirl in the butter to finish the sauce, making sure you keep the pan moving.
]]>
Gyoza, potstickers, dumplings, mandoo, pierogi … they have various names, but they all have one thing in common. They are delicious!
The wrapper remains the same – a thin disc of dough surrounding a variety of fillings, from meat to seafood to vegetables (don’t tell anyone, but I actually used leftover fried rice to stuff these ones in the pictures!).
The problem is, all of these delicious doughs are wheat-based, and I have yet to see a suitable gluten-free option that is a decent texture. And so we’ve been experimenting here in the test kitchen to come up with something.
The main challenge with all things gluten-free is usually textural. Because the gluten-free flours don’t have the same stretch and suppleness to them that wheat doughs have, its a more complicated proposition to find a dough that you can roll out thinly enough and won’t be overly starchy. Same challenge with pasta.
Typically a gyoza maker will roll out the discs of dough with a little rolling pin, but my rolling skills (and patience) are not quite to that level, so I wanted something I could roll out in the pasta maker to a uniform thickness, and use a biscuit cutter to cut out perfect circles.

We ended up going through several iterations here before hitting on this one, which gave a great balance in terms of pliability and a good taste and decent texture once cooked up! (the starch molecules expand as they cook, so what you think is a nice thin dough, can often turn out starchy and overly chewy once cooked up!)
I’m happy to say that this particular dough behaves very well on all fronts. I found once kneaded and rested, it went through the pasta maker reasonably well. I found that setting #5 on my machine was the perfect thickness, letting me stuff and pleat the gyoza without too much fuss and bother – very much like a traditional wrapper dough. I did find that this required a bit of forethought though, as it definitely was better left overnight in the fridge. It allows everything to fully hydrate, which makes a big difference in terms of work-ability.
On the upside, I found that once cut, I was able to layer the wrappers between sheets of burger papers (yes, another burger paper hack!) and seal in a ziploc bag, and they were just fine for a few days. This means that if you are planning to do a bunch of gyoza and freeze them, you can make them in stages, getting all the wrappers ready ahead of time for a marathon gyoza stuffing session!
I’m not going to go into tedious detail on how to stuff these – there are lots of good instructional walkthroughs on Youtube on how to pleat these. Like anything, the first few are the hardest if you haven’t done them before, but once you get the hang of it, you can go through a lot in short order. Resist the urge to go too thin with the dough. While it will cook up just fine, it makes the pleating process significantly harder as the wrappers are much more delicate and harder to work with. I found setting no.5 on my pasta maker was perfect. Our resident engineer claimed it was about 50 thou in thickness for those of you who work with calipers ;).
When it gets time to actually eating these tasty tidbits, you cook them exactly like any regular gyoza. Brown in a hot skillet so the sides get nicely browned and crispy, and finish with some liquid in the pan and a lid, to steam them through and cook the wrappers. Serve with your favourite dipping sauce that has a nice balance of salt+acid+sweet and some garlic or scallions. These can also be assembled in large quantities and frozen (just freeze on a sheet pan and store in a large ziploc bag). The beauty of them is they can be cooked from frozen! just add a couple of extra minutes to the steaming time to cook the insides through.

Ingredients
- 120 grams sweet rice flour
- 180 grams bread flour blend*
- 2 tsp xantham gum
- 3/8 cup hot water + 1-2 tsp as needed (90 ml)
Instructions
- Combine all the dry ingredients in a bowl and whisk well to combine.
- Add the hot water and stir the dough until it comes together, kneading with your hands at the end. ou The dough should be soft, but not overly sticky.
- Wrap the dough in plastic wrap and refrigerate overnight.
- The next day, divide the dough in 3-4 pieces and roll out thinly enough to put through your pasta maker on its widest setting. Work the dough down to approximately 1/16" thick, and cut out 4" circles using a biscuit cutter. Alternately you can roll these out by hand.
- Stack the discs between layers of burger paper or parchment, and store in a ziploc bag in the fridge if you do not intend to use immediately.
- Using your favourite filling, wrap and pleat your gyoza, and cook in a frying pan.
- Serve with dipping sauce.
Notes
*Bread flour blend: 1/2 cup brown rice flour 1/2 cup potato flour 1 cup garfava flour 1 cup sorghum flour 3 cups tapioca starch 3 cups potato starch
A final word here: if you absolutely can’t wait overnight to make you gyoza, I did find that using sorghum flour made for a stiffer, sturdier dough that was quite workable after about 1 hour. I found I preferred the taste of the recipe above, but if you want to go that route, substitute the 180 grams of bread flour blend with 90 grams of tapioca starch + 90 grams of sorghum. The dough is equally workable, but not quite as well rounded taste wise, and not quite as refined a texture.
If you end up making your own gyoza, let me know how they go! and what you end up putting in yours!
]]>